• The Upside to a Deep Freeze

    The weather in Toronto has been a deep freeze this week, with temperatures dropping as low as -27oc (-16.6 oF) with the windchill. Of course, there’s got to be a plus side to such chilly conditions, right? Accordingly, Tito and I drove off to the Hamilton area to do a little winter waterfall hunting. For those of you who aren’t familiar with the area, Hamilton happens to boast more than 100 waterfalls.

    From Wikipedia:

    The city of Hamilton in Ontario, Canada is home to more than 100 waterfalls and cascades, most of which are on or near the Bruce Trail as it winds through the Niagara Escarpment. Hamilton is known as “The City of Waterfalls” and brands itself as “The Waterfall Capital of The World.”[1] Ontario’s internationally recognized Niagara Escarpment provides perfect geological conditions for waterfalls to occur, from Tobermory to Niagara Falls.

    The shots below are all taken from Webster’s Falls in the Spencer Gorge area, which had frozen over beautifully. We also viewed Borer’s Falls, the Darnley Cascade and Tews falls; a stream so thin and tall that it was reduced to just a few icicles. Webster’s was definitely the most spectacular of the lot.

    3V8A1872 3V8A1874 3V8A1885 3V8A1893 3V8A1894 3V8A1898 3V8A1899 3V8A1901 3V8A1903 3V8A1867

  • Commercial Bezels

    After I posted the photos of jazzed up polymer clay I had a moment of enlightenment that, in retrospect, felt bit silly. I realized that instead of going to such trouble to frame my polymer clay, resin it, and add metal components to the back, I could simply put the polymer clay piece into a bezel. What a concept, eh? One method feels like I’m building a bezel around a finished piece (which does have its advantages) and the other involved putting my piece into a finished bezel. I feel like I’ve arrived at a familiar destination, but took the long way ’round.

    However, like all good creative experiments, I learned a lot and I think both methods have their pros and cons. Here are some current pieces I created using commercial bezels :)

    3V8A1521 3V8A1523 3V8A1527 3V8A1530 3V8A1520

  • All Free Knitting

    I’m officially a designer on AllFreeKnitting.com!
    I love designing knitwear patterns–every step of it. I love figuring out a unique, attractive design, puzzling out the construction of it, and even the endless test knits. It’s so gratifying to see projects that others have made with your patterns and I am always happy and humbled that someone dedicated time, effort, and yarn to one of my ideas. I’m looking forward to being able to bring patterns to even more knitters now, thanks Allfreeknitting!

    You can see my designer page here! Check out some of my free knitting patterns below :)

    slouch

    Simple Slouch – FREE
    This one works up very fast, without too much shaping, and is ideal for beginner knitters. The simple knit-purl design is patterned on every row, but the results are super pretty and textured. The yarn has quite a bit of drape for super slouch, and the hat is a forgiving fit. The medium sized hat should fit most adults.

    Yarn: 200 yards of worsted weight yarn. (I’m using KnitPicks Comfy Worsted, Colour ‘whisker’)
    Size: One size fits most

    Blogged here  |  Download on Ravelry here


    manhands

    Man Hands – FREE
    Blogged here  |  Download on Ravelry

    Easy and quick, these simple gloves have just enough pattern to keep you from going batty but are simple enough for dudes to rock without complaining. The waffle stitch pattern is super warm and can show off a variety of yarns. Instructions are given in the pattern for either knitting a basic pair or customizing them exactly to your recipients hands.

    Yarn – 1 skein of Tanis Fiber Arts Green Label Aran or approximately 160-200 yards of worsted weight yarn

    Size Guide:

    Small – 7” wrist, Medium – 8” wrist,  Large – 9” wrist


    Bev Cowl

    Bev Cowl – FREE
    Blogged here  |  Download on Ravelry

    I had a few design goals for this cowl. I wanted it to be versatile – warm in the winter and loose for the transitional seasons. I wanted to fit flatteringly around the neck, and not feel like I was wearing a lot of fabric that draped in the front, but didn’t actually cover my chest. Finally, I wanted it to sit well under a jacket, without a ton of fabric bulking up the back of the neck.

    The Bev has a clever little split in the back, that helps me achieve all of these things. It’s knit in the round for most for the cowl, and then back and forth for the last third or so. The sewn bind-off means that the bottom of the cowl is loose – to cover your chest and shape itself to your body so it’s not like wearing a tube. Best of all, on 5mm needles this baby can be worked up quickly!

    Yarn: 2 skeins Tanis Fiber Arts Green or Orange Label. Samples shown in ‘Sunset’ and ‘Frost’ or approximately 400 yards of worsted weight yarn

    Size: One size fits most


    man slouch

    Man Slouch – FREE
    Blogged here  |  Ravely Project Page here

    This simple slouch/touque is a quick, mindless, easy knit for both guys and gals.

    Because, let’s face it; guys are picky. It can’t be too detailed, in a girly colour or contain un-manly motifs. Here then, is a base pattern for a very simple hat that can be worn slouchy or not, and dressed up easily for the more adventurous. The simple pattern lends itself well to self striping or variagated yarns.

    Yarn: 1 skein of Malabrigo Arroyo or 300 yards of any sport weight yarn

    Size: One size fits most. Pattern is easily customized.


    lisa

    Lisa’s Shawl
    Blogged here  |  Download on Ravelry  |  Craftsy Page here

    This easy crochet shawl works up quickly (ah, the speed of crochet!) Simple alternating patterns of solid and openwork rows are accented by adding beads that are visible from both sides of the finished shawl. A tutorial for adding beads to your crochet is included in the pattern.

    Yarn: 2 skeins of Tanis Fiber Arts Blue Label (sample shown in ‘Grape’) or 800 yards of sock weight yarn.

    Size: One size fits most. Pattern is easily customized.


    Bay_of_fundy

    Bay of Fundy – FREE
    Blogged here  |  Ravelry Project page here  |  Craftsy Page here

    This scarf is pure luxury to wear – 2 skeins of the softest wool imaginable draped stylishly over your shoulders or wrapped up snug around your neck.

    It’s called the Bay of Fundy scarf because it was inspired by the tides at the Bay, and because I knitted most of it while on vacation :) It’s a great travel knit because of the lightweight yarn, and mostly mindless nature of the pattern. The cabling is not complicated but produces a very dense fabric, so if you choose to change yarns make sure to use a needle that is one size larger than your yarn requires.

    Yarn: 2 skeins of Tanis Fiber Arts Purple Label Cashmere or approximately 800 yards of sock weight yarn

    Size: One size fits most. Pattern is easily customized.


    vacation scarf

    The Vacation Scarf – FREE

    Blogged here |  Download on Ravelry here.

  • Jazzed Up Poly Clay Jewellery

    3V8A1518

    I’ve been experimenting with using metal inclusions and resin coatings to jazz up my polymer clay jewellery – and to give them a more polished feel overall.

    3V8A1538

    There are other benefits, besides the aesthetic ones; the resin lends not only shine, but strength to polymer clay jewellery, allowing it to take a lot more pressure before it cracks. This is especially useful with brittle clays.

    3V8A1536

    Even the pieces above, created with leftover extrusion canes and scrap clay, look like intentionally designed piece of jewellery when you add metal and resin to frame the lovely patterns created by the clay.

    3V8A1515

    And when you add silk screening, like the piece above, the results are so lovely!

    3V8A1534

    For this one, I have used a laser jet print and a simple transfer technique to create the tree motif.

    3V8A1533

    I will be writing up tutorials for adding the metal elements, and also for the laser jet transfer just as soon as I can! In the meantime I wanted to share some pics, I love the shiny, polished feeling results.

  • Pampering yourself, and a Good Nights Sleep.

    It’s the little things, right? A nice cup of tea, a yarn with silk or cashmere, a few extra minutes to read in bed–sometimes the little luxuries are the things we forget to give ourselves, even though we’ll readily give these things to others. In the name of looking after oneself, I present to you my Christmas gift to me, and a tip for a really great nights sleep:

    Screen-Shot-2015-01-02-at-11.27.15-AM

    I knit myself selfish, straightforward, fall-off-the-needles, DK weight socks in a beautiful variegated yarn called ‘Tartan‘ from Tanis Fiber Arts. They are thick and smooshy and the colourful yarn made them a pleasure to knit. 2 days to complete. Yep, 2 day socks.

    Now, you don’t need handmade socks for the next bit (though they certainly do help):

    DSCF0005

    Before I go to bed, I try to remember to do this one simple thing for myself (I succeed about once a month, but I’m trying to improve that). I moisturize my feet with something rich, like the Hemp Foot Protector from the Body Shop and then I sprinkle on a few drops of lavender oil. Then I pull my socks on.

    I don’t know what it is that does the trick, the moisturizer, the relaxing result of a short foot massage, the oil, the socks or even just the 5 minutes I took to do something totally hedonistic before bed, but I will go on to sleep like a log. Normally I’m a very light sleeper, but this knocks me right out and leaves me feeling refreshed in the morning.

    Screen-Shot-2015-01-02-at-11.27.09-AM

    Give it a try, even just for the relaxing results :)

    DSCF0003

  • Life is what happens when you’re busy making other plans.
    One of our engagement photos :) Photography by Tami MacInnis. Yarn by Tanis Fiber Arts :)
    One of our engagement photos. Photography by Tami MacInnis. Yarn by Tanis Fiber Arts :)

    This holiday season was a good one for me, even if it didn’t all go according to plan. I had hoped to swim every day as part of a knee rehab I’m desperately trying to achieve, to shoot new tutorials for the blog and to test knit my first triangular shawl. Instead, my knees actually managed to get worse, while I was artistically prolific, I wasn’t organized for tutorials, and though I bought the yarn, I haven’t even touched the shawl.

    Instead I enjoyed some unexpected gifts. I had dinner with my friend Linda, who I’d been meaning to see for a coffee for a very long time, and who found me again via Ravelry of all places. I met and got to chat with a longtime reader of the blog, the wonderful Lorraine. We had only minutes to spend, but I felt that we could have talked all evening given the chance.

    And what a year! I made amazing new friends through my resin work,(Aims! Susan!). I got to meet a true piece of Canadian heritage, Mr. Alvin Ramer. I took up spinning and weaving. My photography was published in Spinoff Magazine. Encouraged by the feedback from my readers, I wrote a book, which also played a part in helping another artist, Amanda from Bloomspoons, launch her own business. Tito and I participated in our first art show as a couple. We helped drive Rayna home, across the country, and got to be the first people in all of North America to watch the sun rise. I got engaged to the love of my life.

    Every year I get a chance to reflect on, not the things I make for the blog, and not the patterns I sell through the blog, but the wonderful people and adventures that blogging had brought my way. From traveling to a convent in Boston (which resulted in my meeting 2 of my best friends!) to images of Newfoundland plastered over walls in Istanbul, I have found that if you open your heart to adventure, and are prepared to get our of your comfort zone and follow your ideas, even if they’re crazy, then beautiful things will come to you.

    This year will be a good one. Tito and I are deep into planning, of course. Planning for the wedding, planning to take up snow shoeing, planning to visit Rayna in Newfoundland this spring.  We will also make sure our hearts are open to the plans we didn’t make, and seize the opportunities that come our way to grow friendships, indulge our art and follow our inspirations wherever they may lead.

    Thank you to everyone who has been a part of my life this year, in the blog or out of it. You all enrich my life more than you could imagine, and I feel very lucky for the little moments that we share.

    I wish you all a happy, healthy and inspired 2015!

  • New Years Resolutions? Maybe start with something light….

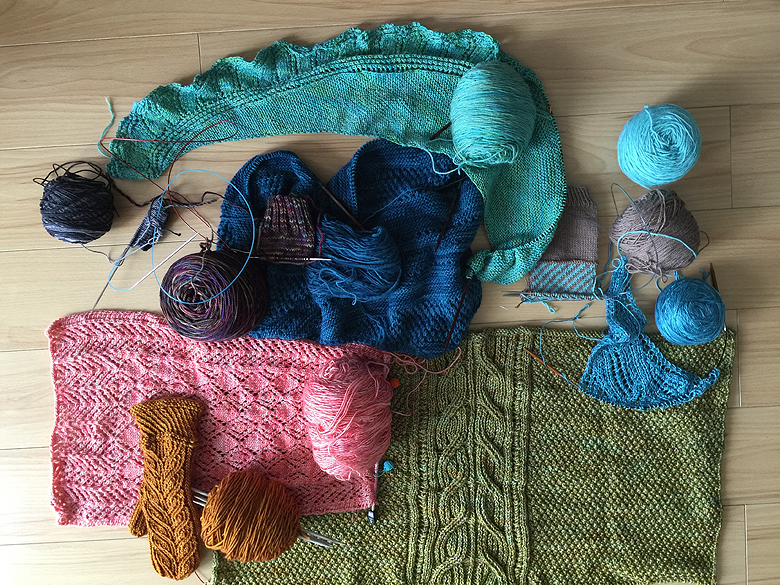
    I’ve decided to start by taking inventory of all the projects I have that are only partly finished, and resolving to get them done and off my needles post haste. Some of you might think that knitting doesn’t make much of a new years resolution unless you’re some kind of tragic underachiever, but trust me, this is a bigger task than it appears.

    IMG_8193

    There are 9 works in progress that need tackling. Not so bad, right?

    IMG_8183

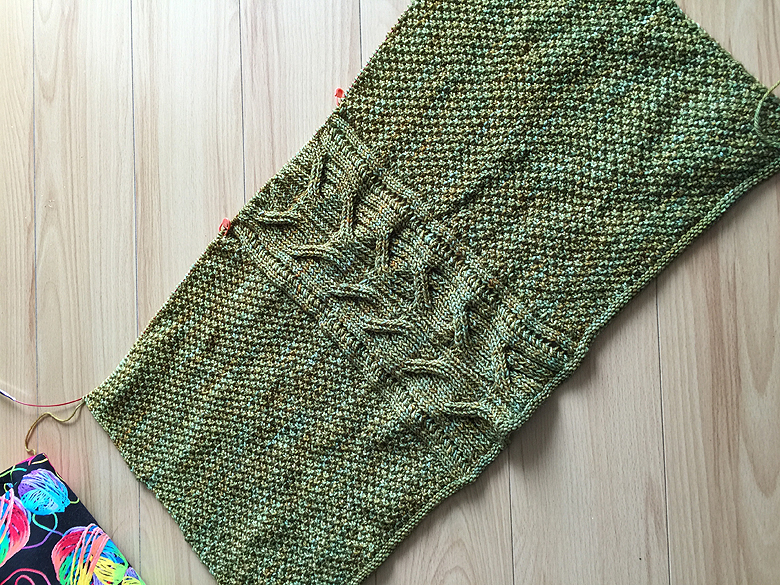
    Except that one of them is a sweater. I started this on the drive to Newfoundland, thinking that, with all that road time, I’d whip off half the sweater in one go (pro tip: the words ‘whip’ and ‘sweater’ do not belong together). I even fretted over not having brought enough yarn. I knit less than half of the front. Yes, this one will take a while.

    Pattern: Sous Sous
    Yarn: Madelinetosh DK, colour ‘filigree’

    IMG_8184

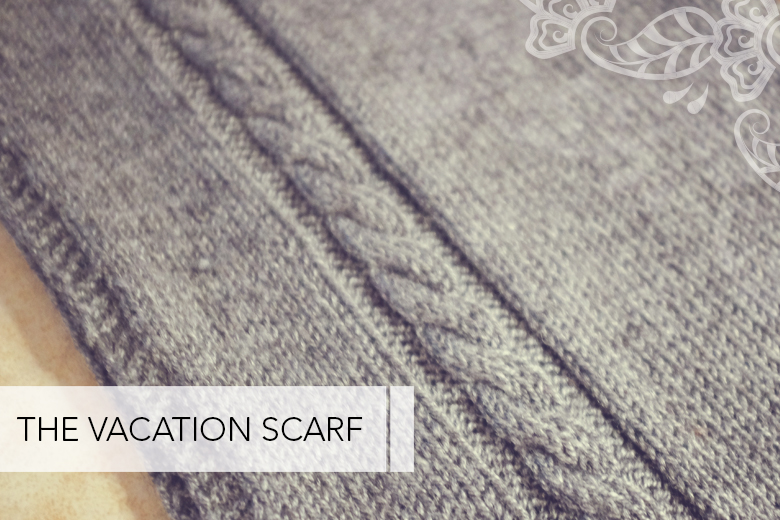
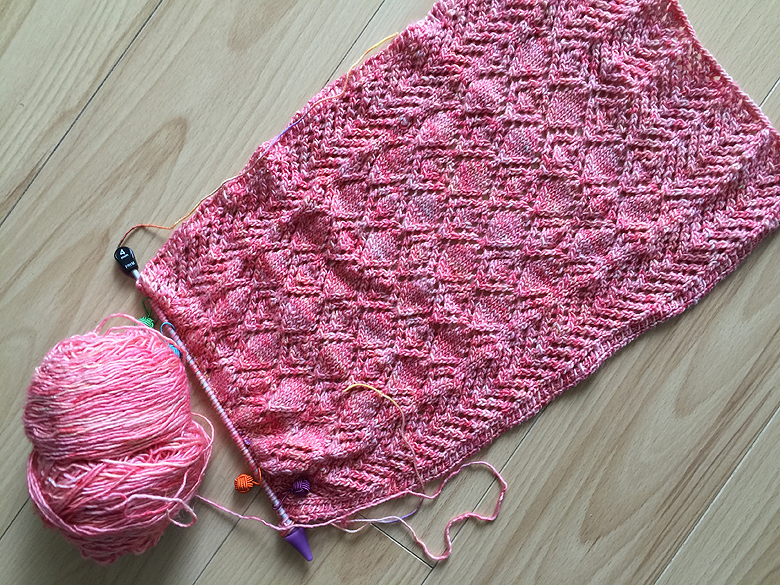
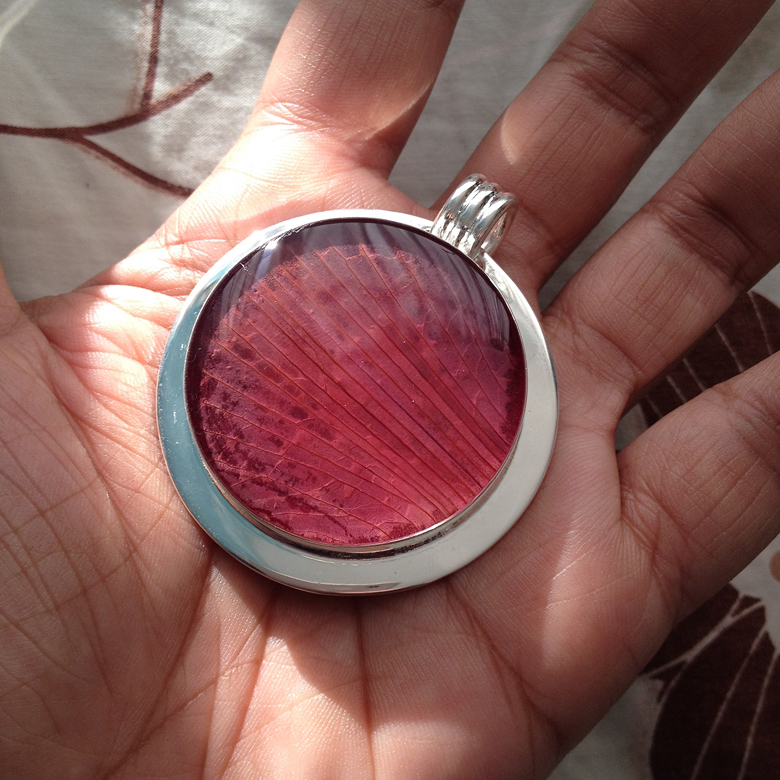
    Look at that gorgeous colour. This lovely scarf has sat around for far longer than it should have. It’s so old, it dates back to a time when I wasn’t as experienced at knitting and found charts a real challenge, so even getting this far in the scarf was hard. I’m guessing that my current knitting skills should have this baby done by mid-January (key word: guessing).

    Pattern: The Fairview Scarf
    Yarn: Tanis Fiber Arts, Red Lable in ‘Pink Grapefruit’

    IMG_8187

    How gorgeous is this mitten? I bought the yarn at the one fiber stop I made in Newfoundland, Cast On, Cast Off. The yarn rocks my world. The pattern rocks my world. Why is there still only one mitt? It’s a mystery. These should get pushed to the front of the list; like debt, pay off the small bills first, right? Besides, it’s winter, and I want them!

    Pattern: Grove
    Yarn: Sweet Fiber Worsted

    IMG_8185

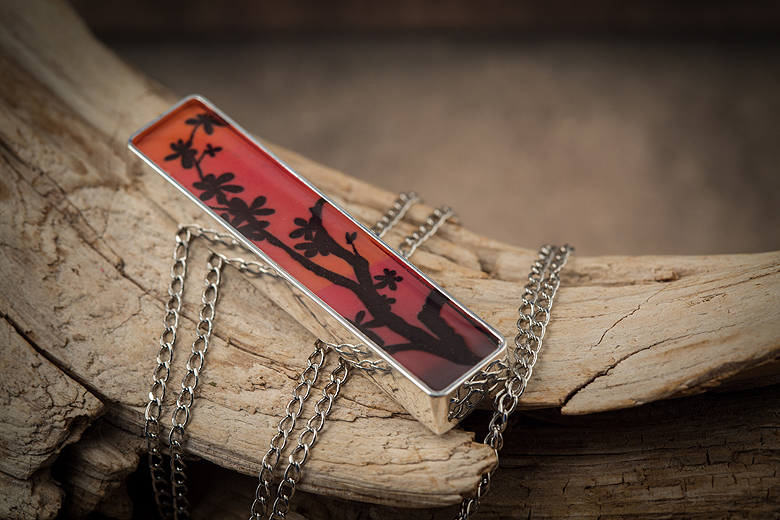
    Here’s another lovely piece that’s been sitting for too long. I cast this on in a hotel room in Puerto Rico, thinking that I would get lots of knitting done while on a cruise with my parents and Tito (clearly, I am delusional about how much knitting I get done while on vacation). A tropical colour, a great pattern, but this may sit on the back burner until it’s closer to spring.

    Pattern: Magrathea
    Yarn: Tanis Fiber Arts OOAK in a OOAK silky sock weight base

    IMG_8190

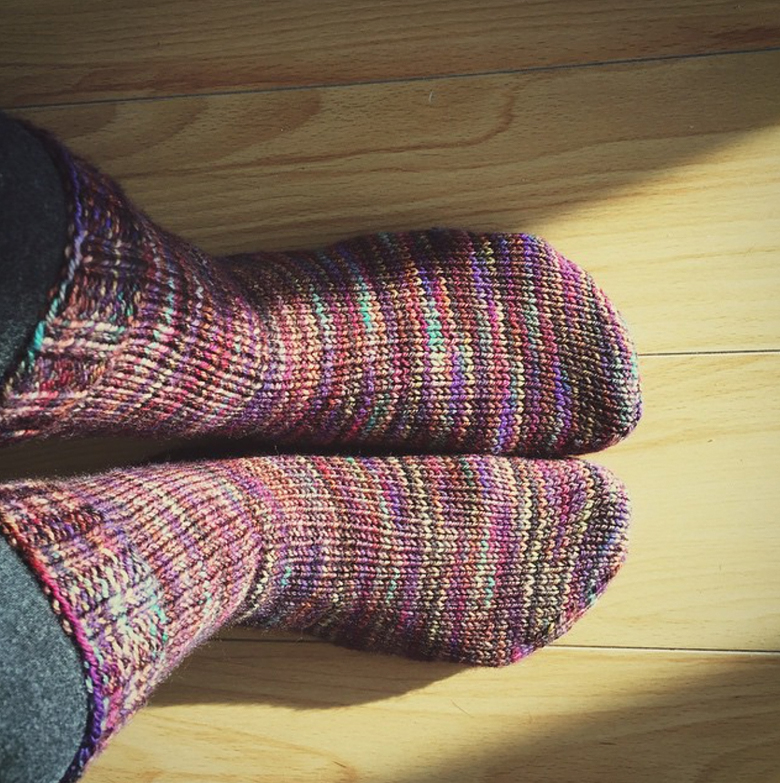
    Sometimes you just need a really simple project to get your mind off all those other projects that you’ve been ignoring, so I guiltily confess that I cast these on today. DK weight socks, for myself. A quick, mindless, gratifying knit in a yarn I can’t get enough of that should be done by next weekend (or might end up on this list, this time next year).

    Pattern: Fudging it with a basic sock recipe
    Yarn: Tanis Fiber Arts Yellow Label in ‘Tartan’

    IMG_8188

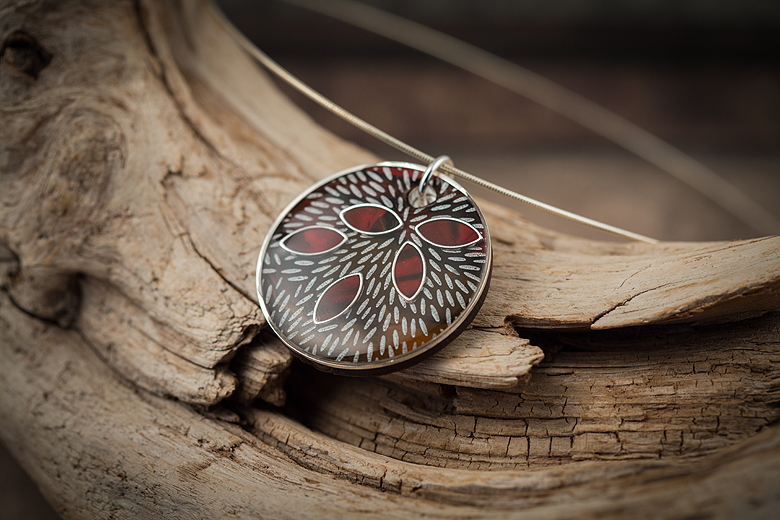
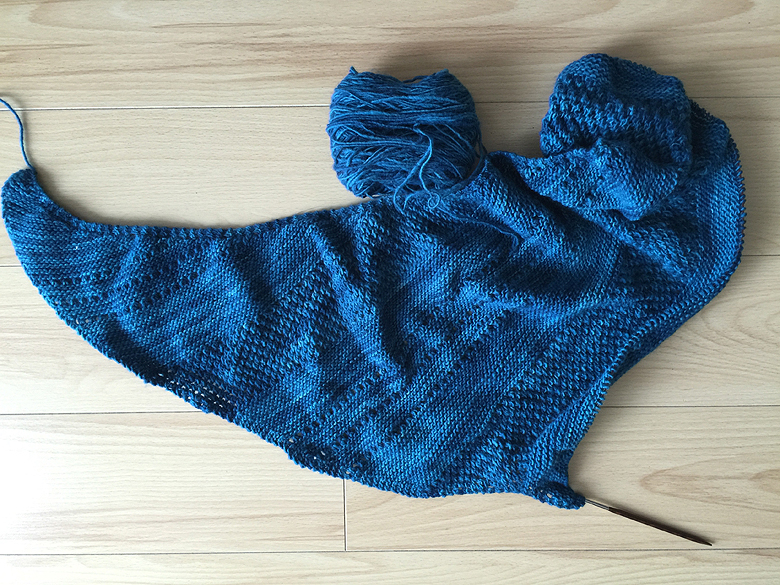
    August 13th, of 2013, I dyed the yarn for this project and after a short period of angsting with Leslie and Ray about the right pattern for our hand dyes skeins we settled on this. It’s lovely, it’s mostly done, but for some reason it never seems to make it to the top of my pile. February, maybe?

    Pattern: Antarktis
    Yarn: My own hand dyed skein, coined ‘theft is the greatest form of flattery’

    IMG_8191

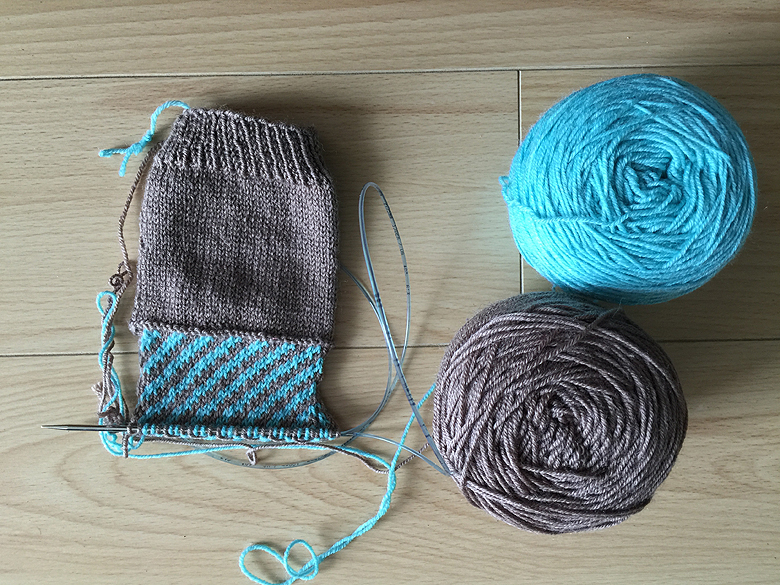
    This one might be destined for a frogging. It’s a prototype for one of my own designs, but I was pulling the yarn a little too much while working the fair isle, with the result that it’s tight in the colour work section. I think it will be cute, but it’s definitely getting shelved til spring now!

    Pattern: Mine :) Hopefully making an appearance around March
    Yarn: Spud and Chloe Fine in ‘Shitake’ and ‘Calypso’

    IMG_8189

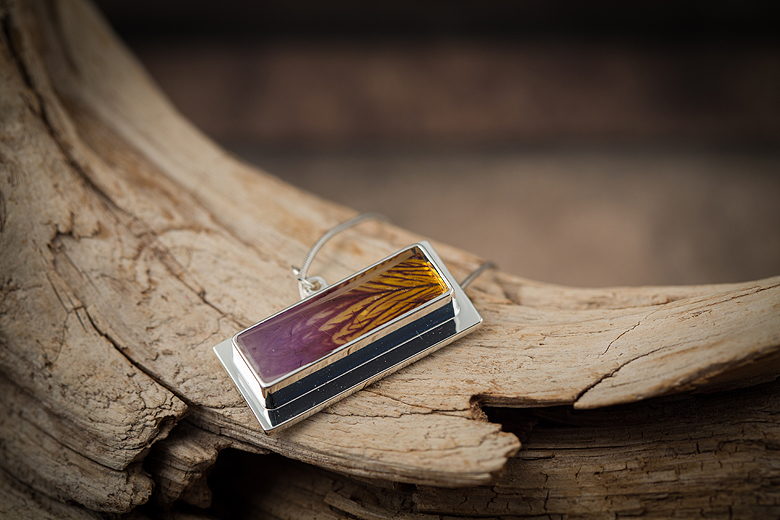
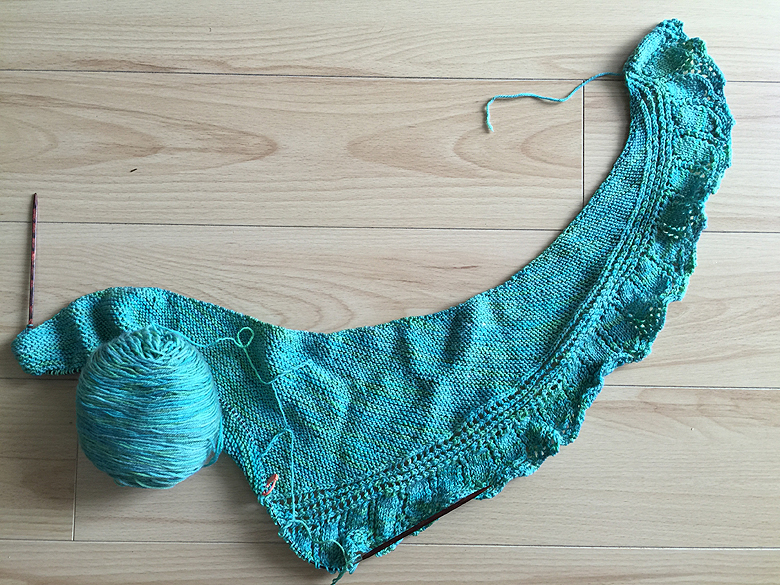
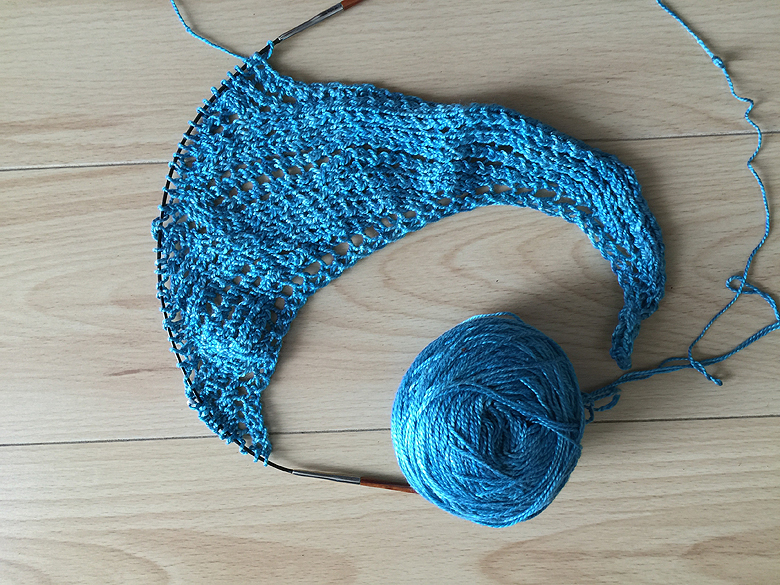
    This stuff is silky and gorgeous and I have about 750 yards of it. I hoarded it forever, excitedly settled on a project, cast on, and promptly forgot all about it. I like to get obsessed with the idea of a gigantic 2-skein shawl for the summer and then fail to have the stick-to-it-ness required to finish the project.

    Pattern: Estuary
    Yarn: Overdyed yarn of Etsy origin

    IMG_8192

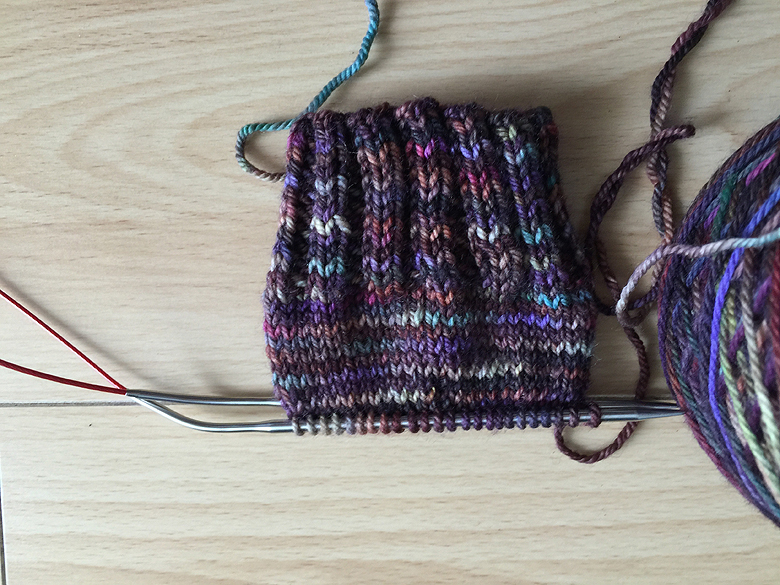
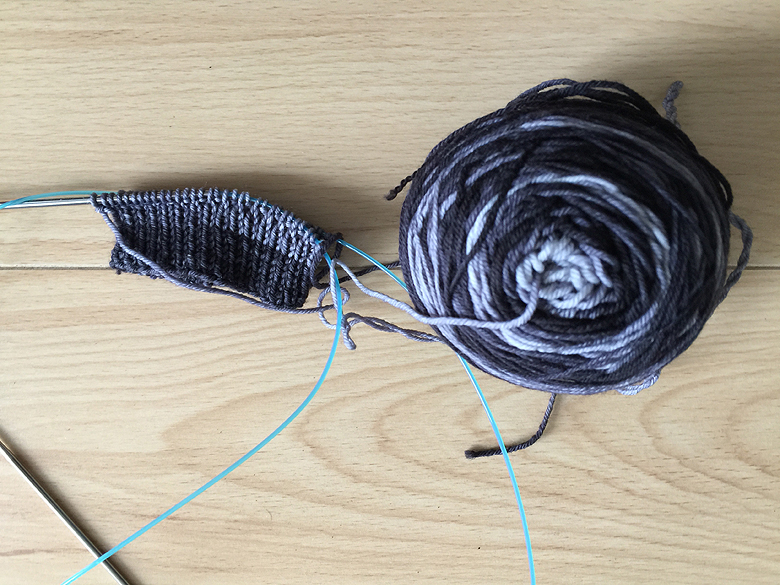
    Finally, socks for daddy. I love gifting socks because of the look on someone’s face when they pull it on for the first time. This makes it worthwhile to plug thousands of tiny stitches (and, apparently, a repetitive strain injury) into something that will take me at least a month. At least the yarn changes colour, which should help keep me entertained during the long journey ahead.

    Pattern: Basic Ribbed Socks
    Yarn: Turtlepurl Yarns, Striped turtle toes in ‘greyscale’

    Nine projects, not bad right? I shall make it my goal to cast them all off by the end of March (ok, maybe not the sweater). WIP’s are a moving target though, I can’t promise I won’t cast anything new on ;)

  • The best laid plans…

    The holidays won. I tried to stick to my plan to shoot nothing but tutorials, but I lost to my holiday schedule. The good news is that I can keep on sharing tutorials through the new year, which will give us all some fun stuff to do in the dark winter months :)

    DSCF0380

    In the meantime, I leave you with photos of adorable cows. Tito and I went up to visit Kim on the weekend to drop off a piece of jewellery (this one is a preserved tiger lily from last summer).

    IMG_8119

    And I got to see my favourite baby, April. Here she is last May:

    3V8A7593

    And last June (the camera-savvy among you will notice that she’s chewing on the strap for my Mark III. Proof of how much I love her).

    3V8A80793V8A8027

    And here she was yesterday!

    DSCF0378-2

    DSCF0397

    Cutest thing ever, right? I just want to take her home. At least for the holidays.

  • The Simple Slouch – Free Knitting Pattern

    tutorial-blank

    This months tutorials have been unfairly balanced so far in favour of polymer clay, so here is one for a super cute knitted slouch hat. This one works up very fast, without too much shaping, and is ideal for beginner knitters. The simple knit-purl design is patterned on every row, but the results are super pretty and textured. If you cast on this week, you might just be done before Christmas!

    ***EDIT***

    A lot of folks have asked me if it’s possible to download and print this pattern, so I’ve created a pdf file to save you on printer paper! Click here to download the pattern.

    DSCF0858

    The yarn has quite a bit of drape for super slouch, and the hat is a forgiving fit. The medium sized hat should fit most adults.

    You will need:

    • 200 yards of worsted weight yarn. (I’m using KnitPicks Comfy Worsted, Colour ‘whisker’)
    • 16 inch circular needles and 4 double pointed needles in the size needed to obtain gauge. (Sample shown using 5.5mm needles)
    • 1 stitch marker (beginner knitters may want to place a marker every 10 stitches to help them keep their place)
    • Tapestry needle

    Gauge: 4 stitches/inch

    Size:

    • Small (17.5 inches around)
    • Medium (20 inches around)
    • Large (22.5 inches around)

    DSCF0862

    Construction notes:

    The pattern is in multiples of 10, with no edge stitches required. If you wish to increase or decrease the hat size, or adjust for a different weight of yarn, simply add or subtract 10 stitches from your cast on. Beginner knitters who are not yet used to reading their stitches may find it helpful to place a marker every 10 stitches, and use a different coloured marker to mark the end of the round.

    Charts

    Using circular needles, cast on 70 (80, 90) stitches

    Ribbing:

    Rows 1-14:  *p3, k2*, repeat to end.

    Body:

    Working from either the body chart (above) or written directions, complete 8 full repeats of the stitch pattern.

    • Row 1: *p4, k1, p1, k4* repeat to end
    • Row 2: *p3, k2, p2, k3* repeat to end
    • Row 3: *p2, k2, p1, k1, p2, k2* repeat to end
    • Row 4: *p1, k2, p2, k2, p2, k1* repeat to end
    • Row 5: *k2, p3, k3, p2* repeat to end
    • Row 6: *k1, p4, k4, p1* repeat to end

    DSCF0872

    Decreasing

    Working from either the decrease chart (above) or written directions, complete 1 full repeat of the stitch pattern.

    • Row 1: *p4, k1, p1, k1, sk2po* repeat to end
    • Row 2: *p3, k2, p2, k1* repeat to end
    • Row 3: *p2, k2, p1, sk2po* repeat to end
    • Row 4: *p1, k2, p2, k1* repeat to end
    • Row 5: *k2, p1, sk2po* repeat to end
    • Row 6: *k1, p3* repeat to end

    Break the yarn with at least 6 inches of tail. Thread the tapestry needle with the tail yarn and run it through your remaining stitches, cinching tightly to close your hat. Weave in your ends and gift it, or rock it yourself!

    DSCF0868

  • Sculpey Silkscreen Tutorial

    tutorial-blank

    I’m sure by now you’ve noticed a theme for the Blue Brick this month–as a Christmas gift to my readers I’m trying to post nothing but crafting tutorials until Christmas day! I wanted to go for 12, but that might have been a bit ambitious ;) Here’s number 4!

    14-K3-4007-Silk-Screens-copy

    This tutorial covers the Sculpey Silkscreen kit. This thing is awesome. It’s a fool-proof way to create gorgeous patterns on your polymer clay, which you can then manipulate into anything you want. I had so much fun with this that I had to divide it into two tutorials, just to show off everything I tried.

    You will need:

    • Polymer clay
    • Sculpey Silkscreen kit
    • Acrylic roller or pasta machine

    1. Roll out your clay, by hand or using a pasta machine, to about 1/8 inch thick.

    3V8A1304

    2. Your kit came with a number of silk screens. Place the one you want, shiny side down, onto your polymer clay. Run your finger lightly over the entire surface, to make sure that the silkscreen is firmly in place.

    3V8A1303

    3. Your kit also came with sculpey paints. Squeeze a line of paint, just outside of the patterned area.

    3V8A1306

    4. Using the plastic tool that came with your kit, spread the paint throughout the pattern, being careful to get every detail.

    3V8A1307

    3V8A1308

    5. While the paint is still wet, peel away the silkscreen to reveal your design. Get the silkscreen sheet and the plastic tool into warm water right away to rinse off the paint before it has a chance to dry. Take the time to rinse it off and pat it dry before doing another piece.

    3V8A1309

    3V8A1310

    6. I used a round cutter to slice out my piece, it’s now ready for me to bake, or use in another design.

    3V8A1314

    7. To open up more design possibilities, I was curious about whether I could use ordinary acrylic paints with my silk screen, rather than being limited to the 2 colours that come in the kit.

    3V8A1324

    8. I proceeded as above, and it works beautifully :)

    3V8A1325

    3V8A1326

    Next tutorial I’ll show you how to take this skill farther, to incorporate it with other techniques and even add metal inclusions!

    3V8A1315