• This weekend I was super stressed with trying to produce inventory for the show. After watching me cast on and rip out a project for the 5th time Tito suggested I take a break and go do some photography. I resisted of course, must…..work….harder! But gave in at last and even though I lost lots of production time I did manage to relax and cheer up which made it all worthwhile. Attached are some photos from the weekend, and also from the summer that are all macro; very close up shots of bugs.

    This shot was my favourite one of the weekend. I had to sit there for about 20 minutes to get this one, but I think the jumping spider’s face is so cute!

    For macro photography I use the Canon f2.8 100mm prime macro lens. It’s easily the sharpest lens I have and one of my best lens investments ever. On top of that I use kenko extension tubes, they allow me to get in even closer. To explain:

    “Extension tubes are designed to enable a lens to focus closer than its normal set minimum focusing distance. Getting closer has the effect of magnifying your subject (making it appear larger in the viewfinder and in your pictures). They are exceptionally useful for macro photography, enabling you to convert almost any lens into a macro lens at a fraction of the cost while maintaining its original optical quality.”

    (Taken from http://www.thkphoto.com/products/kenko/slrc-04.html)

    I got my extension tubes used, at Henry’s, for a little less than $100. They have no glass, and they work like a charm!

    Here’s a great shot – when I found that same dragonfly on another plant he turned out to have captured, and was eating, a ladybug.

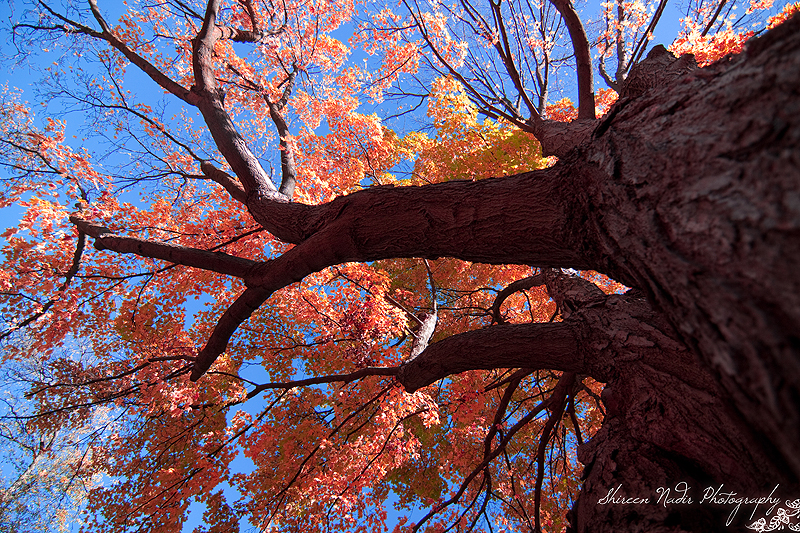
    Ok, so this is clearly not a bug, but I wanted to show how the Canon 100mm performs as a telephoto lens and not just as a macro, I was standing about 30 feet below this little guy.

    I love the colours on this leafhopper! I love them so much I want to glaze something to match…

    All I can say is… “Oh, Hai!”

    This guy is having a bad hair day.

    One thing I love about macro is that for at least half the year there is always something to photograph because there are always bugs about. Even in October at the Leslie Street spit we saw grasshoppers, caterpillars, spiders and even a few garter snakes. This lens is also great for birds, we saw (though I was too slow on the shutter) robins, cardinals and bluejays. Some people think the pics are gross, but I think bugs (except centipedes, eeeewwww…) are just beautiful =o)

  • This past Thanksgiving weekend we had one of the most spectacular autumn days I have ever seen. The combination of clear skies and bright, colourful foliage was a true gift. Add to that the warm, slanted, orange light so particular to autumn and you have a perfect set up for beautiful photos. These photos were all taken at the Terra Cotta Conservation area.

  • Kiluea is an active volcano in the Hawaiian Islands. Last spring, my girlfriend and I celebrated 20 years of friendship by traveling together to Hawaii. I think the most intense, and awe-inspiring part of that trip was a 4am boat trip we took, on 20 foot waves, to see Kiluea pouring lava into the ocean at dawn. It’s one of the most beautiful things I’ve ever seen. Inspired by this awesome sight I have created my latest bracelet, entitled ‘Kiluea’.

    The deep reds of cooling lava are represented by deep red crystal, hot lava pouring out of the cliffside is evoked using swarovski fire opals. Real lava, tumbled, pierced and made from the Hawaiian shield volcanos are used, as well as black Hawaiian sea coral beads, to represent the ocean. Included in the mix are clear crystals and white quartz, for the ocean spray and the head of steam that came up whenever a wave hit the lava.

    This bracelet is the second in my Inspira – natural wonders series (the first being the icebergs of Newfoundland). The bracelet and photography will be available in my upcoming show this November 24th.

  • Here it is at last! After months of careful planning I am deep in preparing the inventory for my latest show, Inspira. I hope that many of you will be able to make it out, it’s my first time including jewelry and knitted items in a show and I’m very nervous and excited for this one =o)

    Wednesday November 24th, 5:00pm – 9:00pm

    At Mangia e Bevi Resto-Bar, 260 King Street East – Cover – $5 at the door

    Complimentary hors d’oeuvres. Cash bar, and dinner menu available.

    Live entertainment by R&B artist Steve JLin. Steve JLin’s  latest single ‘Take it no more” is available on ITunes.  Find out more.

    Your $5 cover, along with 10% of proceeds from the show, will be donated to Central Etobicoke High School, a small special needs school with about 300 students. Most of the students have a Mild Intellectual Disability. There are 5 classes for students with a Developmental Disability. In addition, there are students with Physical Handicaps and Learning Disabilities. The school curriculum focuses on Functional Literacy, Numeracy and Life Skills.

  • My mom has been hard at work lately with her new designs, and I wanted to share some of them here. As usual, she created playful and loud ‘look-at-me’ designs, and her usual taste for unusual and creative photography, even utilizing an old fence and a fire hydrant to get the shots she wants!

    Mom’s work will be featured alongside mine in my upcoming gift show “Inspira” – if you’re in Toronto on November 24th, save the date, more details coming soon!

  • I finally got around to photographing some of my finished work, and what could make a better shot than getting a lovely (and patient) girlfriend to model my work for me!

    Yvette is modelling my Lacy V fingerless gloves and slouch hat in ocean blue merino. She’s holding one of my Wooly Teacups in purple and blue glaze with a crocheted cosy in gorgeous stormy hand-dyed yarn by Tanis Fiber Arts. She’s also wearing a diagonal lace scarf in turquoise lace-weight yarn.


    She also helped me show off my Horseshoe Lace fingerless gloves and slouch hat, while holing one of my 4-colour glazed mugs.

    And last, Horseshoe cable fingerless gloves in soft grey bamboo.

    All of these items, and many more knitted, crocheted and ceramic pieces, as well as one of a kind handmade jewelry and original photography will be available for sale at my Christmas Gift Show this November 24th. More information coming soon!

  • Kool Aid and Food Colouring

    Dying Yarn part II involved venturing into food colouring and vinegar instead of just Kool Aid. It’s messier, but the colours are a little more predictable. My goal was to try and match the glaze colours on two mugs that I was hoping to make coseys for and I’m not sure that I succeeded – though I did learn a lot in the process.

    We mixed the food colouring in shot glasses ;o)

    This was the orange/greenish part

    And this was the purple mix. Confident of my success I poured them both into different parts of the pot. Some spots were bare, so I added a little here and there… and then the colours weren’t quite right so I added some more colours and mixes… and the results?

    Fugly. Or you could make a pride scarf I suppose. Fugly Pride? Fried? Fried is a good name for this mess.

    Take II – this time Tito is involved in an effort to get me to use a more measured approach. Or at least, to not stain the countertops. Here he is mixing up the blue and matching it to the pot.

    Here’s the green…

    And here’s the blue…

    And here’s the mug. It looks promising but I suspect it’s way too saturated.

    Tito’s final mix

    And the final ‘Fried’ mix.

    Here it is opened up – the way I applied the dye ended up leaving huge areas of it that got no coverage. By contrast the Kool Aid had evenly penetrated the other pot.

    Here’s Tito’s. You can see the colours are nicer, but the coverage is still quite patchy.

    The left, middle, and right skeins were dyed using Kool Aid – the coverage on them is much better. I’m not sure how to fix this, definitely some research needed.

    Kool Aid #1 – Cherry, Strawberry and Orange

    Kool Aid #2 – Lime, Strawberry, Grape and Orange

    Kool Aid #3 – Grape, Strawberry and Orange.

    So far in my experiments I’ve got to say I’m happier with Kool Aid! My third attempt will use both, I think Kool Aid for the powerful reds and a touch of blue food colouring for colours I can’t achieve using Kool Aid. I’ll also need to find out why the penetration was so different with one versus the other. Fugly or no, I’m hoping to swatch these up this weekend and see how the colours come out!

  • Just a lot of photos to post today – we’ve been doing so much driving around lately between Alpaca Farms and Merrickville that I thought I’d post of the photos taken along the way of beautiful Southern Ontario ♥

    Apple Orchard

    Sheep Farm – black sheep!

    The foliage in Merrickville is spectacular

    Just about ready for harvest

    The Rideau at night, as seen from the bridge at Merrickville

    Old Barn

    There are quite a few farms that keep Llamas and Alpacas – this handsome guy is from Rivendell farms – where I buy my wool.

    Love this guy! He’s got a mosquito on his nose if you look carefully.

    Can’t wait for our next trip – this time to Glen-Williams, hopefully for some more glass blowing. I’m looking forward to seeing more autumn foliage along the way =o)

  • So Tito and I got to try glass blowing for the first time this weekend – we drove out to beautiful Merrickville for a day long seminar at the studio Kiss my Glass (soon to be Flo, and based in Ottawa). Two lovely people, Bronwin (the studio owner) and Melody were our instructors.

    Molten glass is kept in a kiln, heated to 2000 degrees celsius. You have to use a pipe to spin the glass out in a process called ‘gathering’. At this stage, the glass is very much like taffy. Very different from pottery, just imagine reaching into a live kiln!

    The heat from working with the glass is incredible. You have to wear protective covers on your arms and even then it’s uncomfortable sometimes. Here I’m just about to form the stress lines that will allow me to remove this piece from the pipe.

    Here, the instructor Melody is putting the top on one of Tito’s globes.

    Myself, Melody and Tito. We had a really wonderful time, and learned a ton. I’d recommend trying this to anyone. Kiss my Glass may not be available for a while, but Flo in Ottawa should be up and running soon!

    One of my favourite pieces of Tito’s, this one is a tree ornament.

    One of my paper weights – this one was a neat technique – we pushed into the hot, soft glass with tongs to create dents that would form those air bubbles when more glass was layered on top. The process of rounding it out pulled some of the pigment from the indents to make these lovely ‘stems’.

    One of my ornaments – this one barely lived, but I love the colour!

    Another ornament of mine.

    My second paperweight – in this one you grab the top of the glass with tongs and twist it to create the spiral inside, then you layer more glass on top.

    Tito’s oil lamp. It turned out a bit funky looking, but I love it!


  • So I finally tried dying yarn on my own for the first time, and I decided to ignore the expensive dying kit I bought at the KW Fair and go for Kool-Aid technique first. I was really surprised, I’ve never done this before and the results turned out beautifully, definitely a fun home project for anyone looking to make their own custom yarns! I don’t have a lot of wisdom on the subject, but for the record here is what I did in case anyone else wants to try it.

    Here is the yarn I used – 200 grams of pure Alpaca. I’ve read that Kool-Aid doesn’t work with synthetic fibers, so I used an all natural skein of pure wool that I bought from an Alpaca farm a few weeks ago. I tied the hank up in a few places to make sure it wouldn’t get all tangled on me, and soaked it in hot water for at least half an hour before starting.

    For step 2 we poured out almost all the water, we wanted just enough so that the water only barely covered the yarn in the pot. Then Tito (for I am hopeless at these things) put the yarn on the stove and brought it to a slow simmer. The trick is to not bring the heat up too fast, or to stir it, because these things can cause the yarn to felt.

    These were the Kool-Aid flavours we chose. We had no idea what the colours would turn out as but were hoping for red, orange and pink.

    While waiting for the yarn to simmer we mixed the Kool-Aid. We used very little water, just enough to dissolve the crystals. Don’t add sugar!

    When the yarn was simmering we started to add the Kool-Aid – I poured one colour at one end of the pot, another colour at the other end, and the third colour down the middle.

    Orange, cherry and strawberry turned out to be….red, reddish and orangy-red ;o) I’ll need to find more flavour options next time!

    After adding my colours I let the yarn simmer for another half hour, just to soak it all in. You want to see mostly clear water – so you know the dye is all in the yarn now. We then took it off the heat and allowed it to cool on it’s own.

    When it was cool, we drained it into a colander and used an old towel to gently press out the rest of the water. The results are already looking very cool. Judging by the state of the towel after it seems that it’s quite colourfast.

    Afterwards we draped it over an old easel to dry, and left it there overnight.

    This is from this morning; the colour is great! It’s not quite dry, but when it is I’m really looking forward to working with it. I’ll be picking up another few skeins of alpaca this weekend, and some different flavours to try it again. More pics to come when I see how this knits up ;o)