
Ingredients: 100mm prime f2.8 lens, milk, acrylic inks, lots of light. Fast memory cards help. Cleaning materials are a must.


Ingredients: 100mm prime f2.8 lens, milk, acrylic inks, lots of light. Fast memory cards help. Cleaning materials are a must.
It was tough to pick from such beautiful crafts (knitting, card-making, crochet and scrap booking were popular), but the winner of the necklace is Rosemary!
Rosemary wrote:
Quilting, sewing, beading, kumihimo. Over the years I have tried many things. These are my top 4 currently.
I picked this one because this is first I’ve heard of kumihimo – which is a Japanese form of braiding. I googled some images and really loved them, and I think I’ll be giving it a try.

It looks like it can be done with and without beads as well. Thanks for entering Rosemary, and for adding something new to my creative world! Please send me your mailing address for your necklace :)
Tito and I have these little IKEA lamps beside the bed – and the other night I (having, no doubt, some very serious nocturnal karate match going on) decided to fling my arm out and smash mine. What a mess. Rather than brave the madness that is IKEA I whipped up another one. I love being crafty :)


I wanted to share a super easy technique for bead weaving that I used to create an adorable Swarovski crystal bracelet, at less than a tenth the price.

I needed 32 large frosted Swarovski beads, 16 clear ones and 32 small copper beads – you might need more depending on what size you want to make. Play around with different beads – this technique will work with almost anything!
Step 1 – thread a really long piece of beading string with 2 needles – one at each end. Pick up one bead in colour A, one colour B, another colour A and end with one more colour B.

Step 2 – Insert needle B back through the last bead added, so now both ends of your threads are coming out of one colour A bead, like so:

Step 3 – Pick up one colour B bead followed by a colour A bead on needle B . Pick up one colour B bead with needle A.

Step 4 – Take needle A through the colour A bead.

Repeat steps 3 and 4 until it’s the length you want:

When it’s a good fit, pass both your needles through the base of your clasp and back through the end bead. You are now ready to add the side beads. Make sure they’re small enough to fit comfortably. I recommend doing both sides of the bracelet at the same time. You will pass the needles back though the last colour B bead, pick up one side bead with each needle and go through the next colour B bead, like so:

Keep going this way until both sides are done:

Tie off the end by passing through the end bead and the other end of your chosen clasp a few times. Weave your ends back through the bracelet after tying them off.
And voila! Your own beaded bracelet!


Enjoy :) And feel free to write to me with any questions.
Don’t forget about my contest folks – tell me your favourite craft for a chance to win a lovely resin necklace from the Blue Brick! Click here for details.
I finally finished my latest wooly muggeth designs – a revolutionary new way to consume hot, yummy drinks!

These hand thrown cups were designed with a groove around the middle, to make a secure spot for my knitted mug sweaters.

Using matching thread I sew a strip of no-slip to the inside of my mug cosy – coupled with the groove that I carve into the clay body it makes my mug sweaters absolutely secure while still allowing them to come off easily for cleaning.

When you fill up the mug with hot drinks the cosy part heats up without becoming loose on the mug. So you can wrap your hands around a nice, soft, warm mug sweater and enjoy your tea :)

And for the sweaters I used the leftovers from one of my all-time favourite colourways – ‘graphite’ by Emily (Viola Viola).
Though it was the perfect match for my new mugs I might not have used it if I knew what I do now: Emily is taking a possibly indefinite break from dying yarn. This is tragic, because I am absolutely in love with the colourways this talented lady was creating. So much so that I frogged 2 pieces I had made with her worsted weight graphite, washed and reclaimed them, and am now fretting about what the perfect thing to do with them might be. I’m solving this by designing my own infinity scarf pattern.
Dear Emily – You are so very talented. Thank you for making great yarn. If a time should come when you reconsider… then I hope you will start again because you have a gift for it. If it’s not in the cards, well I’d just like to say So Long and Thanks for all the beautiful Yarn :)
There is still almost a week to enter my contest folks – check out the post to enter!

The Blue Brick Blog – at a mere 1.5 years old, is about to hit 100,000 hits! I’m so stoked I’ve decided to celebrate.
Firstly, though I’ve never understood the appeal until now, I’ve now got a twitter account. Hook me up, @CraftKninja (kninja, get it? Very clever…) to hear and share even more in the wonderful world of crafting goodness.
Secondly – a contest! At that many folks I’m really feelin’ the love – so I want to give some love right back. One lucky winner will get this lovely resin necklace in the mail:

To enter, leave me a comment telling me what your favourite craft is. If it’s something I don’t know yet, maybe I’ll take it up! Contest closes on Wednesday January 18th. I can’t wait to hear about everything you wonderful folks love to do.
From the bottom of my crafty little heart, thank you :)
I wanted something simple to show off a skein of TFA Olive that I picked up – I wanted something for my neck, with just enough pattern to look interesting but little enough that the beautiful colour in the yarn could really shine.

I chose the Age of Brass and Steam – a free pattern on Ravelry by Orange Flower. What a quick knit, it cast on Saturday and was blocking the following Saturday. Easy, mindless and beautiful. The simple construction allows the varigated yarn to really take centre stage. For some reason, though I’ve been in love with Olive for a while this is the first skein of it I actually bought, so I felt pressured to find just the right pattern for it.

One skein of TFA DK weight yarn goes a long way, so the only pattern mod I made was that I kept going for a while after the last eyelet row.

In retrospect I probably should have stopped at the last eyelet row, because I kept going the edges have a tendency to curl that no amount of blocking will fix. I love it anyways though – it’s hard not to, just look at that colour!

I give this pattern the thumbs up for sure – definitely recommend!
I was so inspired by some of the sea glass jewellery I’ve seen that I decided to make my own, but I had to do things a little differently!

For a start, Toronto is nowhere near the sea, so I had to make do with glass from the Leslie Street Spit. Since the Spit is all made from construction refuse, glass that had been polished by the waves was easy to find.

The next problem was that I don’t have a glass drill, so I used silver heavy gauge wire to wrap each piece. I think the results are still quite lovely.

I love the Leslie Street Spit – and I couldn’t stop thinking of the possibilities for jewellery made from it. After working with polished glass I tried an experimental piece with glass that was still rough looking, but smooth enough to wear:

It looks like rough quartz – I love it!

Lastly I experimented with what I believe were broken pieces of tile that were also strewn around the beach.

The tile had been similarly wave polished. To give the ends a more finished look I used silver filigree cones.

I polished it off with simple magnet clasps. I definitely enjoyed this little exercise, can’t wait to try making more!
I know, it’s been a while since I shared a new recipe, and this one is not 100% sugar free to boot! However, the sugar was low enough that I decided to give it a try. I plan to bake it again using agave nectar to try and achieve a sugar free AND Splenda free version soon, if it works out I’ll share it here! (Oh, sorry for the bad cellphone pic, it was all I had handy). It was taste tested on my mom, of course, and she loved it!

Directions:
Preheat oven 350 degrees.
Grease and flour two medium loaf pans.
In a bowl combine egg, brown sugar, sugar, apple sauce, and margarine.
To bowl add baking powder, baking soda, cinnamon,nutmeg, salt, and vanilla.
Add flour slowly.
Add shredded carrots, zucchini and nuts.
Beat mixture until smooth
Pour loaf into pans.
Bake 45 mins or ’til toothpick comes out clean.

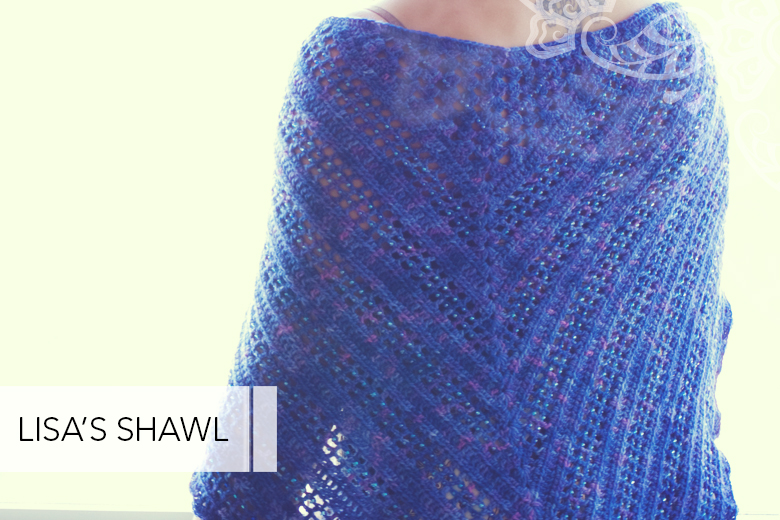
 The Lisa Shawl is a free crochet pattern by yours truly – a fun, quick crochet project with beads to spice it up. The shawl is named after my gorgeous and colourful friend Lisa who was the first person to love this design :)

The shawl is worked up using 2 skeins of sock weight yarn. My shawl was done in TFA Blue label Grape, and Lisa’s in Ella Rae Lace Merino, in the whimsically named colourway #117.

The beads are easy to add, visible from both sides and add a lovely weight to the finished piece.


You will need a 3.75mm hook for the main body, a 1.0mm hook for the beads, and about 50 grams of size 6.0 seed beads.

You can download the pattern here. Or check out the Ravelry page here.Enjoy!

