
Free Pattern – The Bev Cowl!
ByI know you guys have patiently sat through an awful lot of posts about Resin Jewelry – so it’s time for a triumphant return to knitting. And where better to start than with a free pattern?

The Bev Cowl uses 200g of worsted weight yarn to created the comfiest, squishiest easiest-to-wear cowl ever.
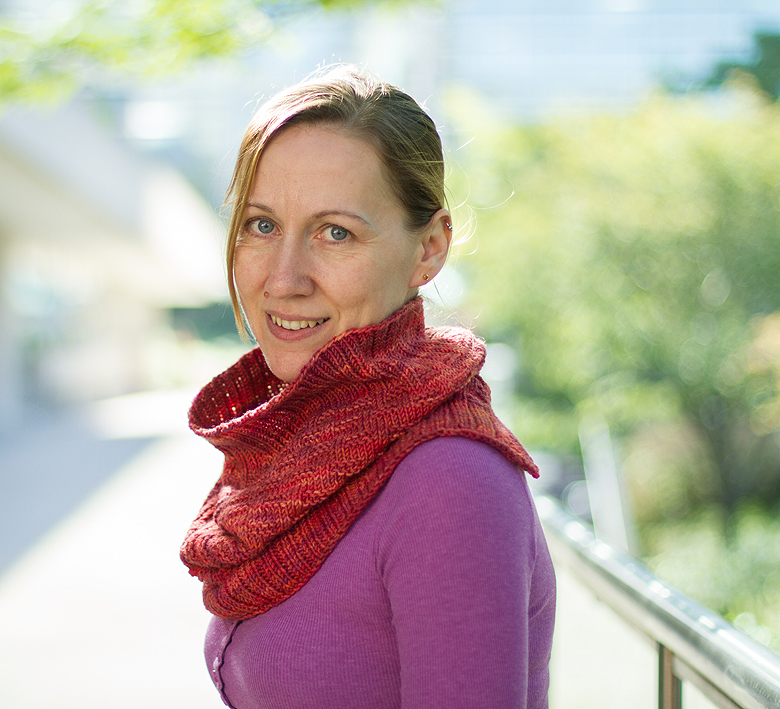
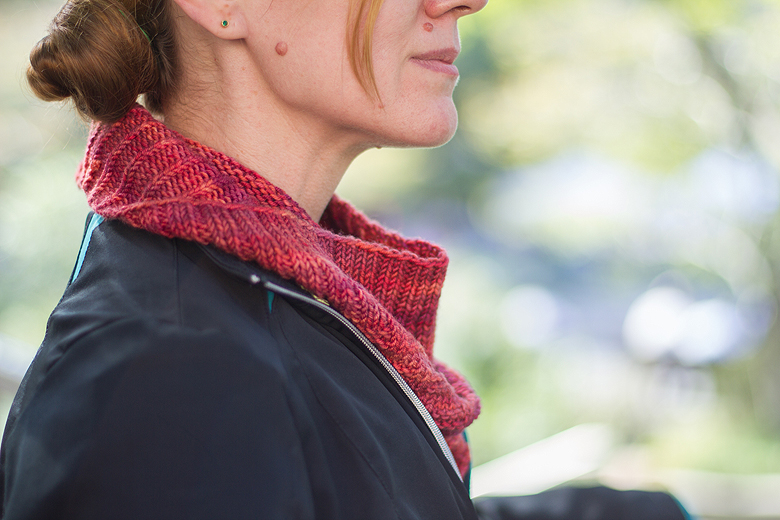
I had a few design goals for this cowl. I wanted it to be versatile – warm in the winter and loose for the transitional seasons. I wanted to fit flatteringly around the neck, and not feel like I was wearing a lot of fabric that draped in the front, but didn’t actually cover my chest. Finally, I wanted it to sit well under a jacket, without a ton of fabric bulking up the back of the neck.
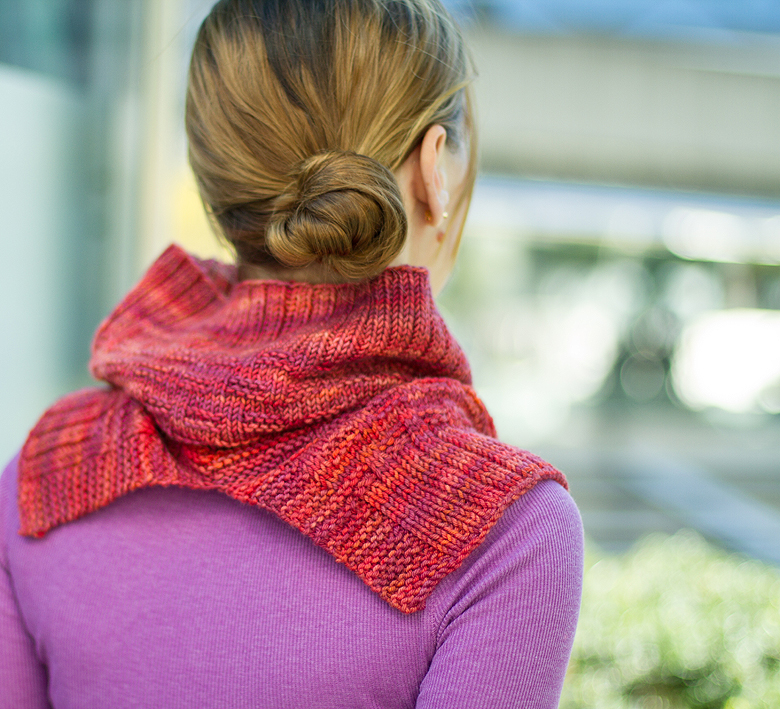
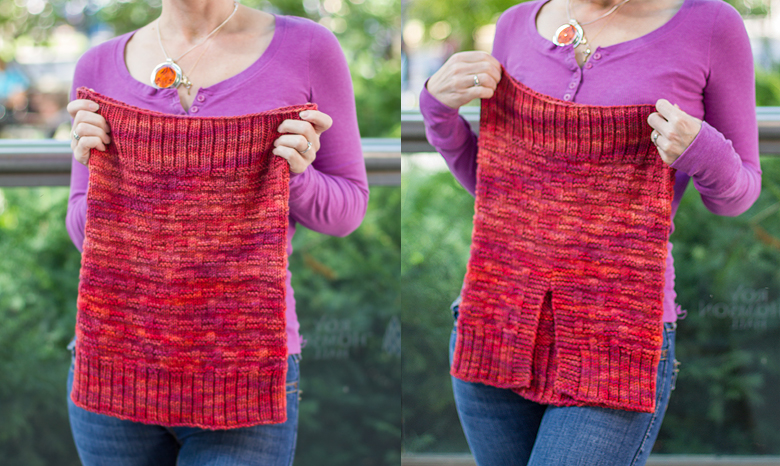
The Bev has a clever little split in the back, that helps me achieve all of these things. It’s knit in the round for most for the cowl, and then back and forth for the last third or so. The sewn bind-off means that the bottom of the cowl is loose – to cover your chest and shape itself to your body so it’s not like wearing a tube. Best of all, on 5mm needles this baby can be worked up quickly – because winter is coming!
Here are the instructions – it’s super simple, and mindless. If you really want something special, switch the yarn from Green label to Orange Label Cashmere/Silk – you’ll never take it off!
The Bev Cowl
Gauge: 18 stitches = 4 inches in stockinette
You will need:
- 2 skeins Tanis Fiber Arts Green or Orange Label. Sample shown in ‘Sunset’
- 5mm, 24″ circular knitting needles, or size needed to obtain gauge
- Tapestry needle for sewn bind-off and weaving in ends
- 3 Stitch Markers
C/o 120 stitches, place marker and join for working in the round, being careful not to twist your stitches.
Ribbed Section:
Row 1 – 20: *k2, p1* repeat from * to end
Begin patterned stitch:
Row 1: *k2, p4* repeat to end
Row 2: k to end
Row 3: *k2, p4* repeat to end
Row 4 – 6: k to end
Row 7: *p4, k2* repeat to end
Row 8: k to end
Row 9: *p4, k2* repeat to end
Row 10-12: k to end
Repeat rows 1 -12 four times
Prepare for split section:
Row 1: p6, pm *k2, p4* repeat to last 6 stitches, pm, p6
Row 2: k6, sm, k to marker, sm, k6
Row 3: p6, sm *k2, p4* repeat to marker, sm, p6
Row 4: k6, sm, k to marker, sm, k6
Row 5: p6, sm, k to marker, sm, p6
Row 6: k6, sm, k to marker, sm, k6
Row 7: p6, sm *p4, k2* repeat to marker, sm, p6
Row 8: k6, sm, k to marker, sm, k6
Row 9: p6, sm *p4, k2* repeat to marker, sm, p6
Row 10: k6, sm, k to marker, sm, k6
Row 11: p6, sm, k to marker, sm, p6
Row 12: k6, sm, k to marker, sm, k6
Split section (you will now switch from working in the round to working back and forth, keeping the 6 stitches of garter stitch on both sides of the split. At the end of every row, turn your work.)
Row 1: p6, sm *k2, p4* repeat to last 6 stitches, sm, p6
Row 2: p6, sm, p to marker, sm, p6
Row 3: p6, sm *k2, p4* repeat to marker, sm, p6
Row 4: p6, sm, p to marker, sm, p6
Row 5: p6, sm, k to marker, sm, p6
Row 6: p6, sm, p to marker, sm, p6
Row 7: p6, sm *p4, k2* repeat to marker, sm, p6
Row 8: p6, sm, p to marker, sm, p6
Row 9: p6, sm *p4, k2* repeat to marker, sm, p6
Row 10: p6, sm, p to marker, sm, p6
Row 11: p6, sm, k to marker, sm, p6
Row 12: p6, sm, p to marker, sm, p6
Repeat rows 1-12 twice and then rows 1-9 once more
Re-establish ribbed section:
Row 1 (WS): p6, sm, *p2, k1* repeat from * to marker, sm, p6
Row 2: p6, sm, *p1, k2* repeat from * to marker, sm, p6
Repeat rows 1 & 2 eighteen more times (20 rows of ribbing)
Bind off using Elizabeth Zimmerman’s sewn bind-off. I recommend sticking with this bind-off to make sure the cowl fit correctly at the bottom.
Wet-block, weave in your ends and rock it on super chilly days!
Ravelry project page here.

What a clever design! Thanks for sharing this beautiful pattern.
LikeLike
I love it!! What a great idea to have a slit in the back.
LikeLike
[…] anymore, and started (slowly) trying to get my knit on again. Here is my latest FO – another Bev Cowl, done up with 2 skeins of TFA green label in ‘Chris Grey’. This pattern is so snugly and warm, […]
LikeLike
[…] Cowl – FREE Blogged here | Download […]
LikeLike
What does pm and sm mean?
LikeLike
Hi Wendy! pm means ‘place marker’ and sm means ‘slip marker’. In case you haven’t used them before, the markers help you keep track of your knitting :)
LikeLike
Do you have a total plain knitting (no purling) cowl pattern for those of us who prefer to only use the knit stitch? Help!
LikeLike
That’s an interesting idea :) Unfortunately this particular cowl definitely depends on a purl stitch, but I hear you – I hate purling too! I’ll keep that in mind when I design another cowl – hopefully you like lace!
LikeLike
This is a very clever design, especially the back split so it will lay flat over back and shoulders and not bunch up. I wonder if you could give the dimensions for the cowl, please? If I knit to gauge given it should be about 26.5 inches around but I didn’t find a row gauge so uncertain how tall it would be? I’d like to make it for a very petite young woman so would appreciate any measurements you can share. Many thanks!
Janet
LikeLike