
Ombre Dyed Yarn DIY
By
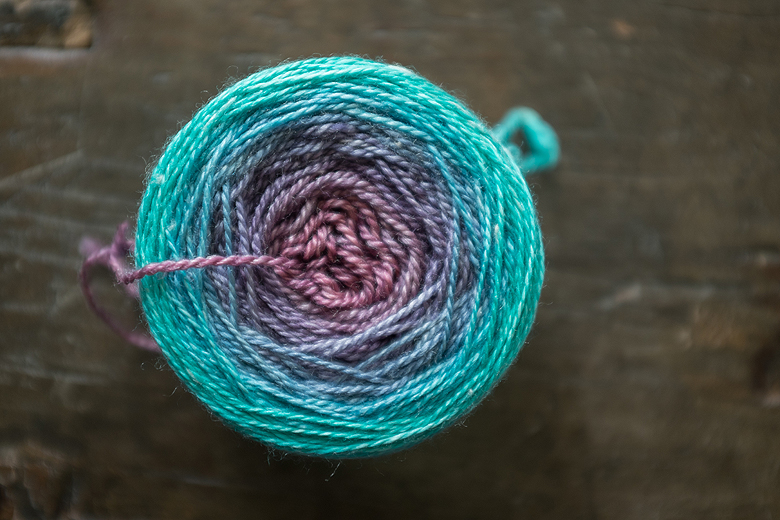
I love the idea of ombre yarns, and since I got weaving I’ve been dreaming of a beautiful ombre scarf, plain weave, with a neutral warp, transitioning over the course of a long, fine fabric.
Laurie from The Black Lamb had given me 2 skeins of a beautiful, natural merino silk sock yarn when I bought the loom, so last night I decided to experiment with my own ombre dye job. Here are the details of how I did it, and I’ll definitely be trying to do it again (with better photos) in the near future!
*Before you start – I’m using a silk merino superwash blend. If you’re not using a superwash, then be super gentle, because this process can be hard on your yarn and you don’t want it to felt!
Divide your yarn into mini-skeins. There is no real easy or fast way to do this–I recommend putting the skein on a swift if you’ve got one, and unwinding it onto a niddy noddy, chair, or even your arm. I was not very scientific about mine – I wrapped it around my arm 40 times, tied off my mini skein and then, without cutting the yarn, began another 40 wrap skein. This gave me 10, more or less equal mini-skeins that were all still attached to each other by a length of yarn.
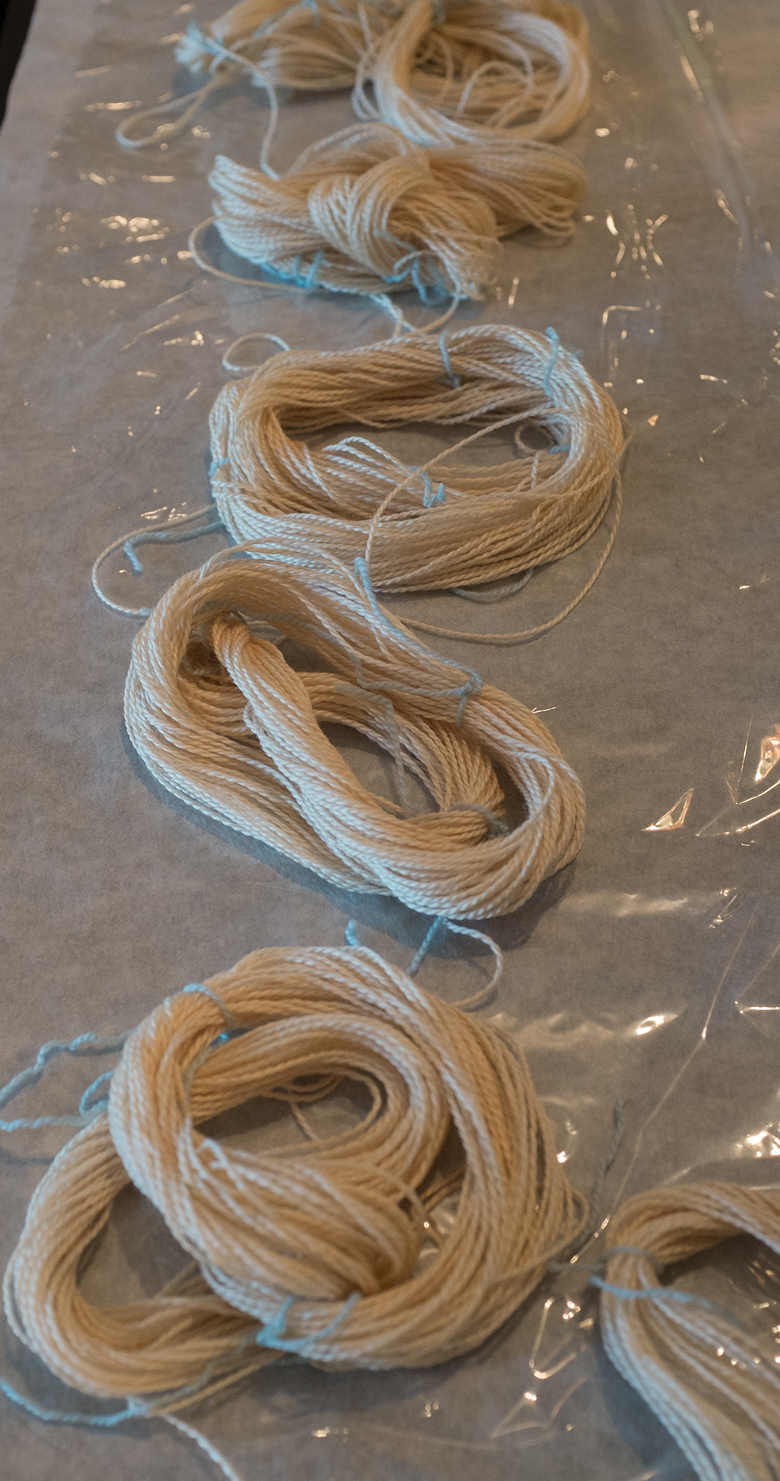
Fill a bowl with a water-vinegar mix. I’m using 3 parts water to one part vinegar. I found that 6 cups of water and 2 cups of vinegar were enough, in my case, to cover my yarn completely. I put my 10 mini-skeins in the mix and let it soak for about 30 minutes.
On my dining table I laid out a few strips of wax paper (to protect my table) and then covered it in plastic cling-wrap.
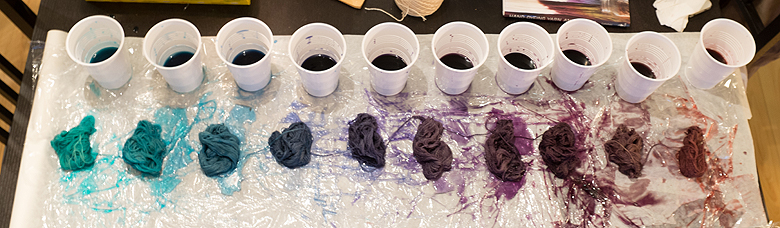
While the yarn was soaking, I prepared my dyes. I set up 10 plastic cups (because I’ve got 10 mini-skeins, you might need a different number) and put about 1/3 cup of water into each one. I’m using a combination of food dye and Jaquard Acid dye to create my colours.
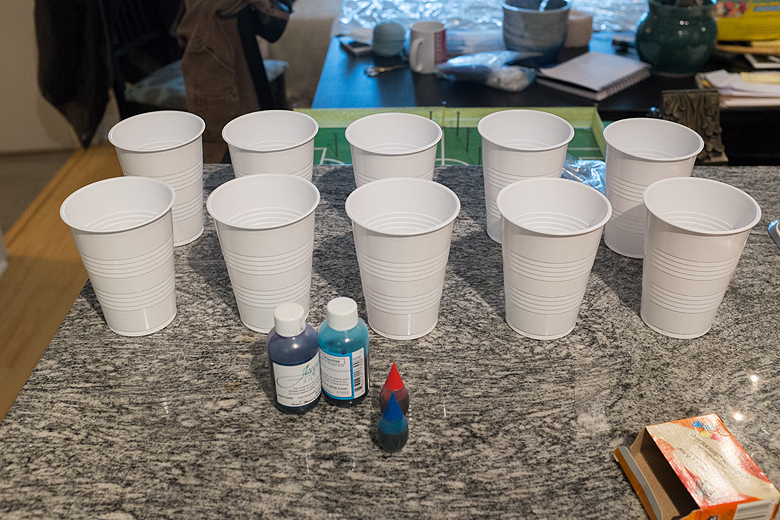

To graduate the colours, here’s what I did:
- Cup 1: 3 parts Jaquard Turquoise
- Cup 2: 2 parts Jaquard Turquoise to 1 part Jaquard Blue
- Cup 3: 1 part Jaquard Turquoise to 2 parts Jaquard Blue
- Cup 4: 3 parts Jaquard Blue
- Cup 5: 3 parts Jaquard Blue with 1 drop of red food colouring
- Cup 6: 3 parts Jaquard Blue with 2 drops of red food colouring
- Cup 7: 2 parts Jaquard Blue with 3 drop of red food colouring
- Cup 8: 1 part Jaquard Blue with 4 drop of red food colouring
- Cup 9: 1 part Jaquard Blue with 5 drop of red food colouring
- Cup 10: 1 part Jaquard Blue with 6 drop of red food colouring
The practical upshot of this is that you change your colour mix gradually over however many cups you’ve got. You can control the degree of change and the number of steps as needed to get the colour shift you’re looking for. To test whether my colours were shifting the way I wanted them to, I dipped a small piece of paper towel in each cup and laid the paper towels out in a row to see how the colour change looked. This is a good time to tweak your colour mixes if you need to.
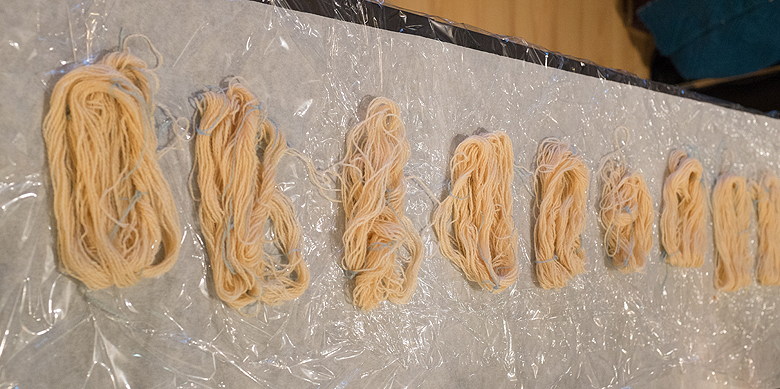
After the requisite 30 minutes, I took my yarn out of the vinegar bath and laid it out on the plastic wrap, gently separating the mini skeins from one another.
I placed a cup in front of every skein, and put on rubber gloves to protect my hands. Very gently, and starting with a very small amount, I poured the dye from each cup onto the skein in front of it, ‘squishing’ the yarn gently as I did so to make sure the inner fibers were receiving dye as well.
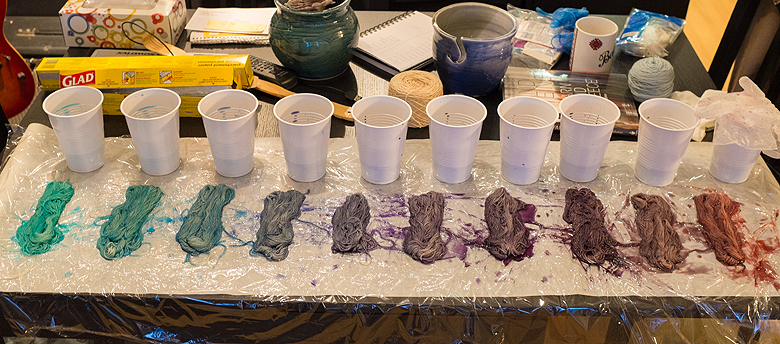
I continued up the line until all the yarn was treated and then started back at the beginning again, adding dye until the yarn was fully saturated, being careful not to allow the little pools of dye to mix with each other more than I could help. Having said that, you do want to make sure the little lengths of yarn that connect one skein to another are receiving dye as well!

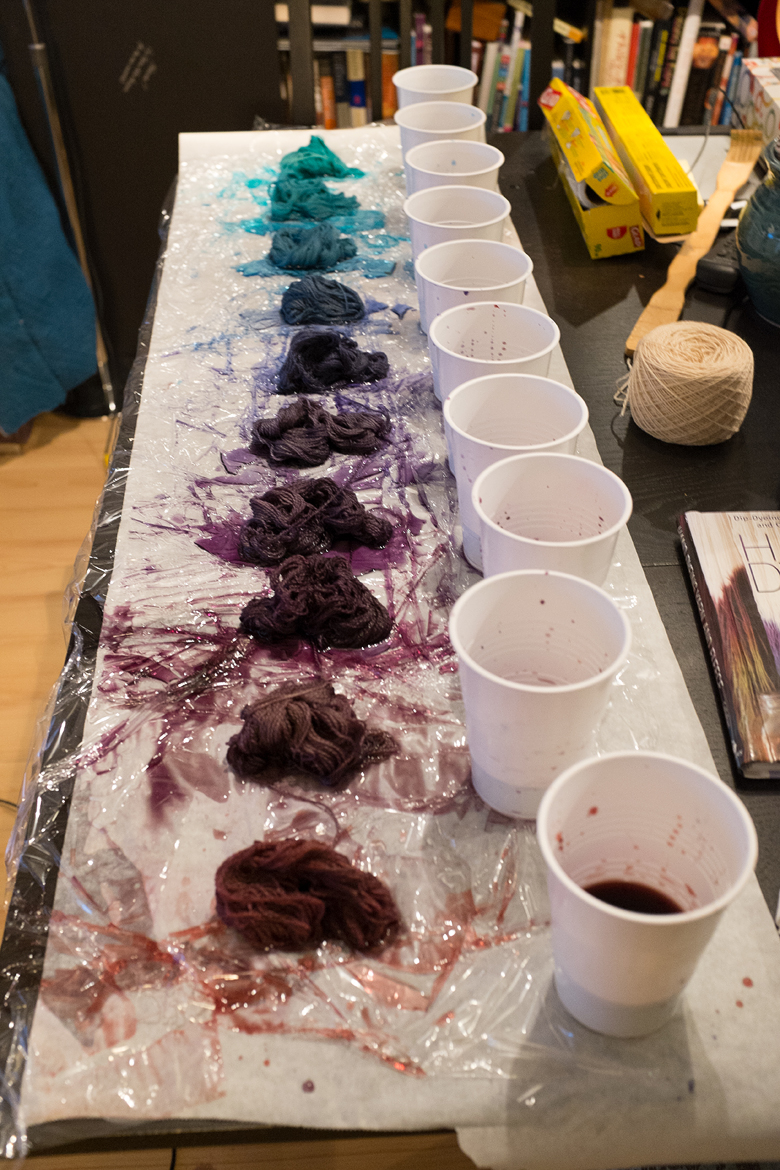
When the yarn had absorbed as much dye as it could, I pulled up the sides of my cling wrap and used it to wrap the yarn, as one whole package, and I put that package in a microwave safe bowl to keep it from leaking everywhere.
Place the bowl in the microwave and nuke it, one minute at a time, checking in between to see if your dye bath is ‘exhausted’ (that is, if the water is coming out clear, or if it’s still full of dye). Once you’re getting clear water, take it out of the microwave and put it in your sink to cool off.
ONCE THE YARN IS COOL and not before (you’d be surprised how hot it gets) gently open the plastic wrap and give your yarn a cool water rinse with a little mild detergent. Don’t let the water run directly on the yarn if you’re not using superwash – even this can cause felting.
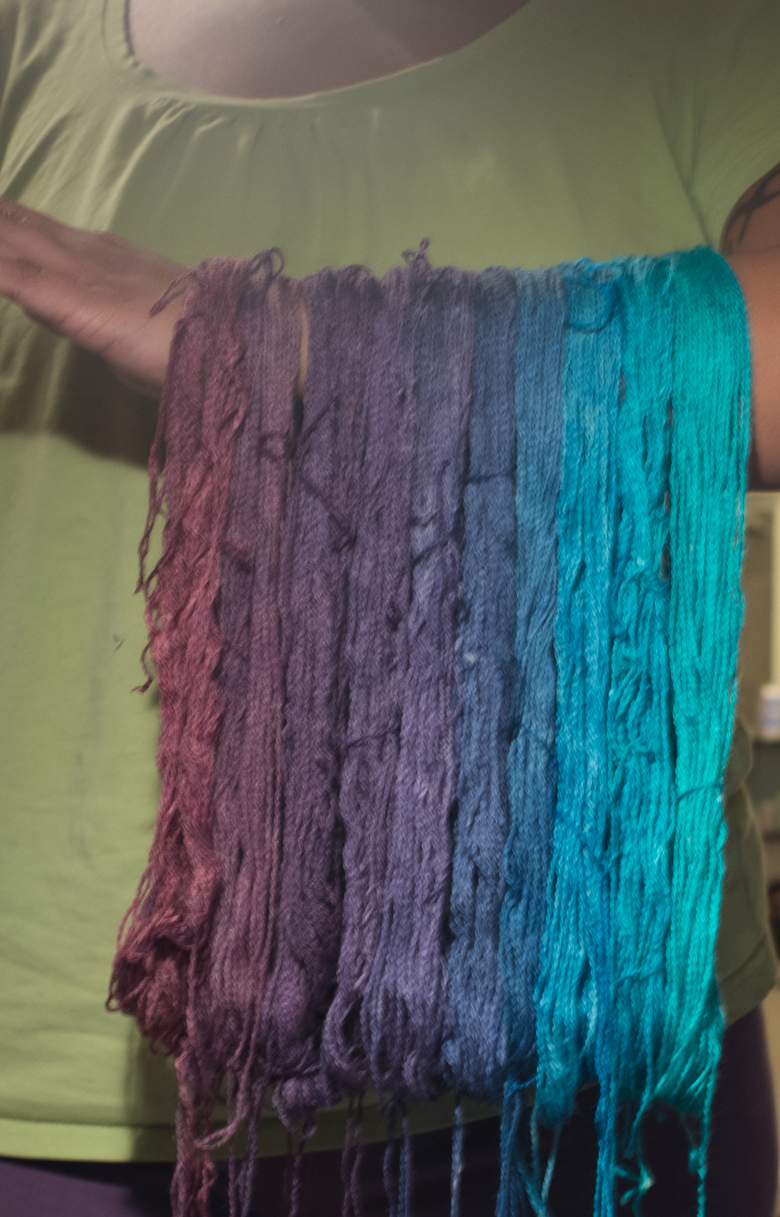
Crappy cellphone shot of my finished work
Admire your handiwork. You should be feeling pretty rockstar at this point.
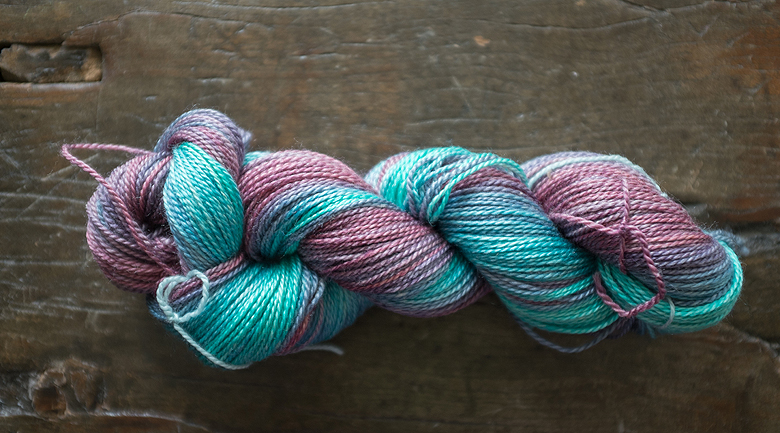
Gently press out the excess water with a towel (that you don’t care about) and hang it to dry. Once dry, undo your little ties and re-wind the mini skeins into one big skein. You’re done!

Beautiful. Makes me want to try this.
LikeLike
You are a mind reader. I was just wondering these past few days how this is done and have been meaning to research it. You have written a fantastic tutorial that is easy to understand for an absolute novice like me. Thank you kindly. Once I find a place in Australia to purchase the colours (and I actually believe I found one just yesterday) I am going to attempt this. Cheers!
LikeLike
FABULOUS!!!!!!!!!
LikeLike
excellent tutorial and pictures, it will be interesting to see your finished project woven up.
LikeLike
Gorgeous! Your weaving prowess amazes me, and now this too. You’re a superstar.
LikeLike
Coming from you that’s pretty much the highest praise imaginable <3
LikeLike
That was amazing! I always wondered how dyeing could be done in a home setting. The part I can’t “absorb” is the whole works in a bowl (colours mixed together) in the microwave, checking once in awhile to see if it runs clear. What makes the moisture turn clear? the heat? Cus there’s been no rinsing up to this point, right?
LikeLike
Hi Lorraine
Correct, there’s little to no mixing. What I did was try to make sure a bit of plastic wrap was in between each mini-skein when I was wrapping it, to prevent the colours mixing. The water turns clear because the yarn has absorbed all the dye available – if you’ve still got dye in the water then your yarn is not done!
Hope that helps :)
S.
LikeLike
That is very cool! I have never thought it could be so easy! Now I want to try it, although, your choice of colors was excellent!
LikeLike
[…] For the full tutorial on how I dye these skeins, click here! […]
LikeLike
[…] my ombre yarn dying experiment? Here’s what became of it. I warped from the centre outwards, so that my colours would change […]
LikeLike
Beautiful Yarn!! I love the ombre look and one day I am going to attempt yarn dyeing…
LikeLike
I wonder if you can help, How did you mix your dyes? I made a very very bad experiment last night trying to ombre dye but think I got all of the mix wrong as some colours came out not only sronger than others but a total mess of colour or no colour… in short distaster! What strength did you mix your dyes too and how much did you add as a part to each pot?
This tutorial is just amazing and the yarn is beautiful thank you so much for sharing!
Nu
LikeLike
How much is ‘one part’ of dye, please?
LikeLike
Hi Cynthia! One part simply represents a ratio, rather than an actual amount. For example, if I’m using 1 part blue to 2 parts red, that means there is twice as much red as there is blue. To make it easier you can think in terms of teaspoons, in which case this would be 1tsp blue to 2 tsp red. Does that make sense?
LikeLike
wow… beautiful.. can this method e used for cotton yarn??
LikeLike
Hi Daisy, I’m pretty sure it would work, but be aware that animal and plant fibres will absorb the dye differently, and your colours may not be as vibrant. Good luck!
LikeLike
I am floored by how clear and encouraging your tutorial is, and I am anxious to try the process. A question, however, if I may; will the process work on 100% cotton? And one more (sorry): must I use a microwave? I don’t own one. Thank you again, George
LikeLike
Hi George!
100% cotton is a plant fiber, and will not work with the sam acid dyes I used, which are meant for animal fiber. I recommend going to a Michaels and looking for fabric dyes that are intended for cotton. Regarding the microwave, you don’t need to use one, but you do need to heat set your dyes. Some people like to use canning jars in a pot of hot water, or even just a plastic container, sealed and left out in hot sun, if hot sun is available where you are ;) I did a lot of my initial dye experiments using a crock pot that I got form a goodwill, there are lots of options.
LikeLike
Love this! Just wondering, which Jacuard blue dye shade did you use (I’m guessing it was either royal blue #625 or cyan #622)? Thank you!
LikeLike
[…] There is a mini-skein + painterlyish approach I have not tried that is better for many-color mixes: https://thebluebrick.ca/2014/04/10/ombre-dyed-yarn-diy/ […]
LikeLike
[…] Blue Brick […]
LikeLike
[…] split the yarn into 7 different sections as Blue Brick explained how to do and tied them off into little […]
LikeLike
Beautiful! Thanks for sharing!
I have been trying to figure out the process myself and realized I had to make separate skeins, but wasn’t sure how to heat set it afterwards. I will be trying this, this afternoon!
Fingers crossed…
LikeLike
Hi. I just found this today – best explanation I have seen to make ombré dye. Thanks so much for sharing your method.
LikeLike
Hello, I came across your tutorial and I just tried it! my cake came out super cute :) But I was wondering how is the best way to separate the larger skein into minis and then rewrap it into the larger skein? I had a lot of tangling and it was all over the place… took me like an hour just to try untangling. HELP ! haha :) I do have a swift and ball winder.
LikeLike
Hello, I came across your tutorial and I just tried it! my cake came out super cute 🙂 But I was wondering how is the best way to separate the larger skein into minis and then rewrap it into the larger skein? I had a lot of tangling and it was all over the place… took me like an hour just to try untangling. HELP ! haha 🙂 I do have a swift and ball winder.
LikeLike