
FO – Travel Knit Scarf
By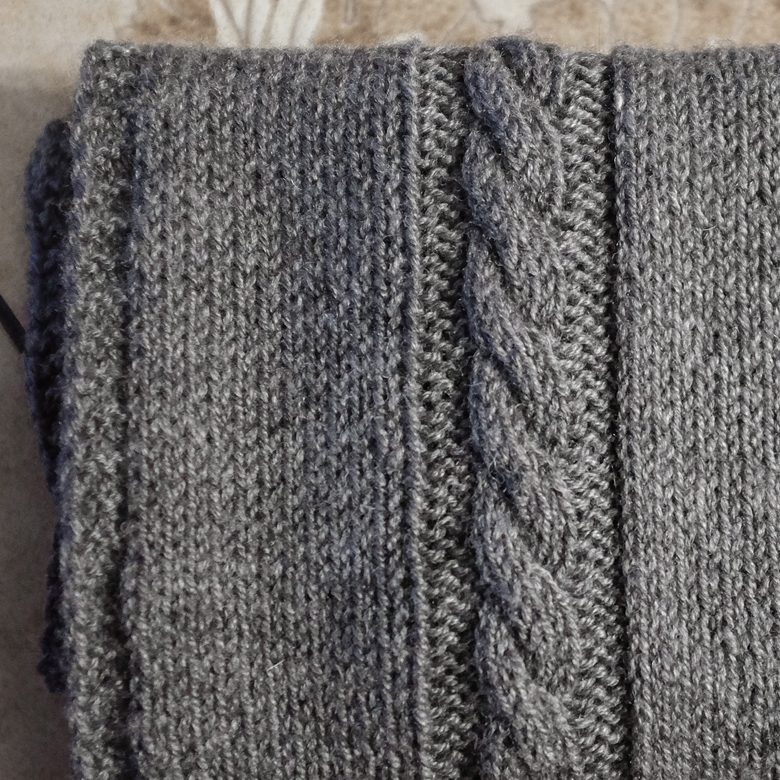
Vacation knitting is always a conundrum, right? You don’t want to be bored, you don’t want to lose all that precious knitting time, and you don’t want to run out of stuff to work on. Here’s my criteria:
- Mindless (No charts, no lace, no pattern to carry about)
- Portable (No multiple balls of yarn, no striping or colour work. Nothing huge)
- Not Socks (This is just a personal thing. To avoid having someone in an airport confiscate my needles, I prefer to fly with wooden circulars, and I hate knitting socks on anything that isn’t metal)
- Fast (I wanted to end my trip with a Thing, not another WIP)
In this case I decided to write my own quickie patten for a scarf. It’s been hella cold, and I had 2 skeins of unbelievably soft Alpaca from the Kickin’ Back Alpaca Ranch in their signature grey. I knew that yarn had to be a scarf for my dad.

Daddy is not a scarf kinda guy, so it had to be classy. I wanted just enough detail to keep it interesting and masculine and keep me from dying of boredom, while simple enough that I could knit it on airplanes and on a cruise ship and (since it wasn’t done when I came home), during the gold medal hockey games ;)


The ‘pattern’ hardly justifies the name since it’s so simple, but if you want to get the same results I got, see my instructions below.
A few notes on construction – the slipped stitch at the beginning of each row was to give the piece a nice attractive selvage. The ‘purl through the back loop’ instruction twists the stitch immediately following the cable to keep it nice and tight and eliminate that horrid ladder that occasionally can happen with cables. If this is not your thing you can ignore that bit; just give your yarn a little tug after the first purl and the results will be the same. There are 4 stitches of garter at each end to keep it from curling.

You will need:
- 3.5 mm needles (I’m using wooden 16” circular needles per my point above)
- 200g of sport weight yarn (approximately 400 yards)
- Tapestry needle for weaving in ends
- 4 stitch markers (Optional. The knitting will be very easy to read.)
- Cable needle (Optional. I cabled without a needle for this project, here’s a great tutorial)
Gauge: It’s a scarf. Live a little.
Note: Work the ‘Slip 1’ instructions at the beginning of each row as follows:
Slip one as if to purl with yarn in front. Move the yarn to the back of the work and continue in pattern.
Cast on 62
Garter stitch edging:
Rows 1-4: Slip 1, knit to endBegin Cable section:
Row 1 & 3 (RS) Slip 1, k3, pm, k30, pm, p3, k6, p3, pm k12, pm, k4
Row 2, 4 & 6 (WS) Slip 1, k3, sm, p12, sm, k3, p6, k3, sm p30, sm, k4
Row 5 (RS) Slip 1, k3, sm, k30, sm, p3, C6F, p1tbl, p2, sm k12, sm, k4Work rows 1 – 6 until you only have a few yards left.
Repeat Garter stitch edging:
Rows 1-4: Slip 1, knit to endBind off loosely
To really get all that stockinette to lay nice and flat I soaked it (in Soak, of course) for about 20 minutes to really saturate the fiber and then used blocking wires (see photos) to open the piece up.

Finished dimensions: About 12 inches wide (may vary because of my lackadaisical attitude towards gauge in this case) by about 50 inches long.
Abbreviations:
- k – Knit
- p – Purl
- p1tbl – Purl 1 through the back loop.
- pm – Place Marker
- sm – Slip Marker
- Slip 1 – Slip one as if to purl with yarn in front. Move the yarn to the back of the work and continue in pattern
- C6F: Cable 6 front: Slip 3 stitches to cable needle and hold in front, K3 and then K3 from cable needle

Super warm and just the right length to tucking into a winter jacket and covering up the chest – daddy loves it! And where practicality took off, guilt came in, which means that he actually wears it too!

Ooh, nice. Sort of a simpler ‘Bay of Fundy’ (which I made for my step-mum). Just might have to do this…
LikeLike
Very nice! Your knitting has such a uniform tension, and thanks for the tips on the first stitch and stitches along side the cable. Very nice.
LikeLike
Beautiful knit!!
LikeLike
My scarf is still curling at the edges after blocking, what can I do to trouble shoot this?
LikeLike
How can I print the directions for the Travel Knit Scarf? There is no option for me to print it. Help, really want to make this scarf for my grandson as a Christmas gift.
LikeLike
[…] to do the infinity scarf, and I wanted to get going on a new project right away so I picked out a different scarf on my Ravelry queue, one that’s worked flat. I got to work on it without being sure if […]
LikeLike
[…] Blogged here | Download on Ravelry here. […]
LikeLike
Love the scarf! But I can’t print out the directions, is there some sort of block on the web page that doesn’t allow you to print anything from it? Than you……
LikeLike
Do I have to use circular needles? Don’t have any experience with them.
LikeLike
[…] needles to do the scarf, and I wanted to get going on a new project right away so I picked out a different scarf on my Ravelry queue, one that’s worked flat. I got to work on it without being sure if […]
LikeLike
Would 4mm needles work just fine?
LikeLike
I made this recently for a friend – so easy and fun to make and it came out beautiful in a cream colored wool. Drawing inspiration from your images, I blocked it using my skinniest knitting needles – that was easier than pinning. Thanks for posting this pattern — I’m going to use it again and again!
LikeLiked by 1 person
Thanks so much for this pattern. It’s lovely. I’m using Knit Picks City Tweed yarn and it will be a very nice gift for my son. I’m not familiar with blocking techniques and am a bit worried about getting it to lay flat once I’m done. I do not know anything about “Soak” or blocking wires. Can anyone point me in the right direction to get these and use them or perhaps give me a simpler method to block the scarf? It definitely curls as is.
LikeLike
[…] needles to do the scarf, and I wanted to get going on a new project right away so I picked out a different scarf on my Ravelry queue, one that’s worked flat. I got to work on it unsure if I’d keep it […]
LikeLike